
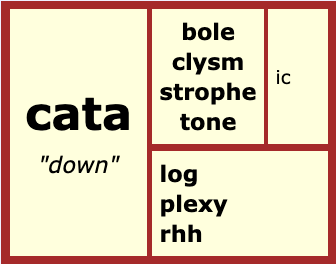
When I read about a woman in Mali having nonuplets a month ago, naturally my first thought was, “Yikes! Nine babies born at one birth?” But just this morning that news was topped when I read of a South African woman giving birth to decuplets two days ago! Most of us have heard of triplets and quadruplets, but having nonuplets and decuplets is so rare, they may be world record setting! The more I thought about the words ‘nonuplets’ and ‘decuplets,’ the more I was reminded of how many times I’ve come across familiar morphemes in words that help indicate a particular number. I also thought about the different ways we use these elements in different contexts. In thinking about these different ways to group things and the common morphemes we use to represent those numbers in words, I learned some interesting things!
Numbered sets – usually at one birth
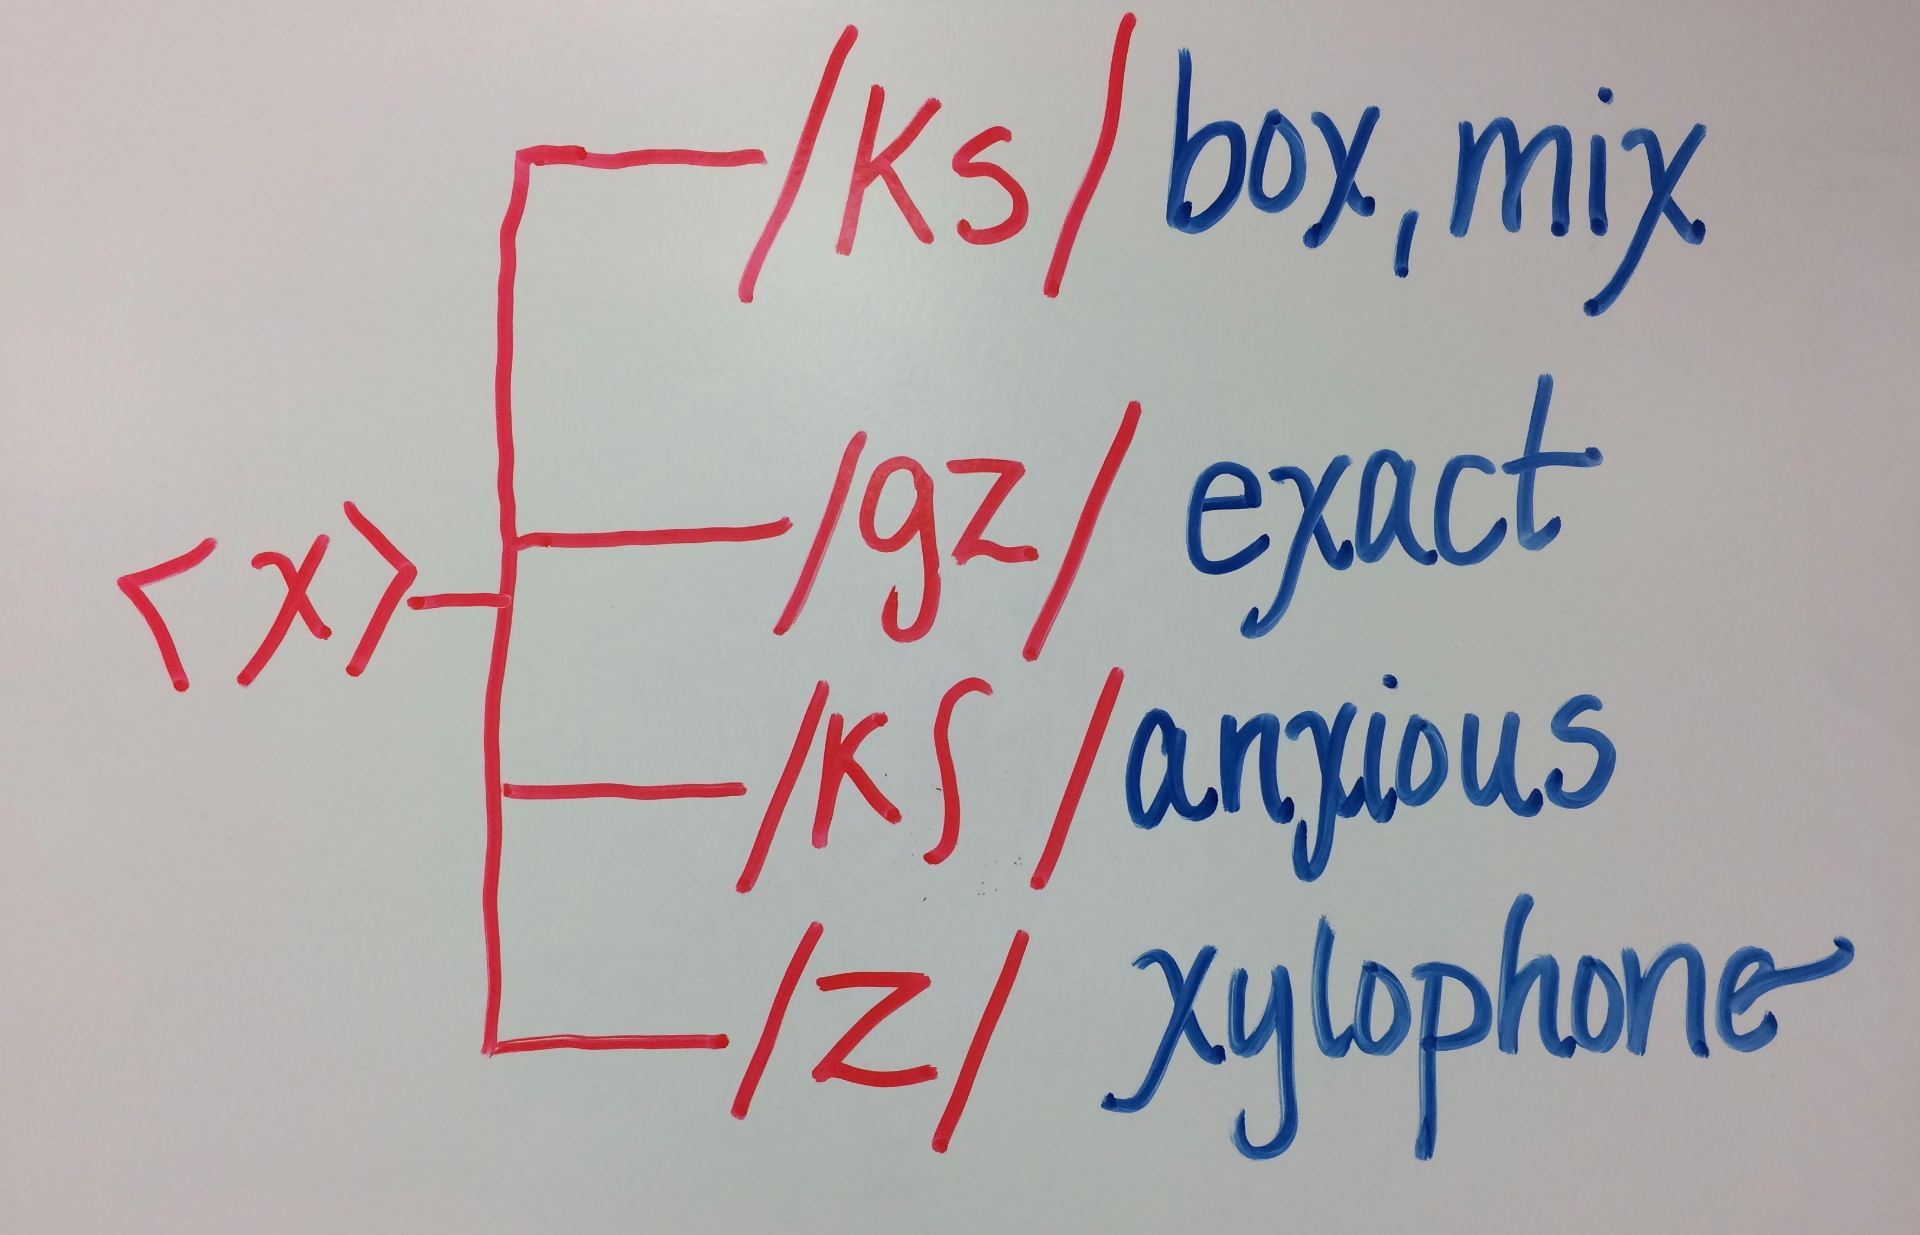
The headline read, “Nonuplets: Woman From Mali Gives Birth To 9 Babies : NPR.” Nonuplets. How many is that? Well, obviously, the headline tells us it is nine. Nine babies born in a single birth. We recognize this word ending as connected to numbers of babies born at one delivery. And now there is this new report out of South Africa that a woman has delivered decuplets! Etymonline explains that the spelling of ‘quadruple’ came from ‘quadruplet,’ and the spelling of the ‘plet’ came from the ending on ‘triplet.’ Are these words uniquely fitted to babies? Not at all. Quadruplets are sets of four. They don’t have to be four babies. Triplets are sets of three. They don’t have to be three babies. But my guess is that most people picture sets of babies when they hear these.
twins
triplets
quadruplets
quintuplets
sextuplets
septuplets
octuplets
nonuplets
decuplets
According to Wikipedia (and this will come as no surprise to you either), twins are the most common type of multiple birth. Without fertility treatments, the chances of having twins is 1 in 60. The possibility of having fraternal twins runs in families. The possibility of having identical twins does not. The chances of having identical twins is more like 1 in 250.
Having triplets is much less common with the possibility being 1 in 1000. Triplets can be identical (least common), fraternal (most common), or a combination of those. According to Etymonline, in 1831 another name for triplet was ‘trin’. As you can probably guess, it was modeled on ‘twin’. Quadruplets are even less common than triplets. Although as fertility treatments become more widely used, the possibility is increasing. Quadruplets are usually a combination of fraternal and identical.
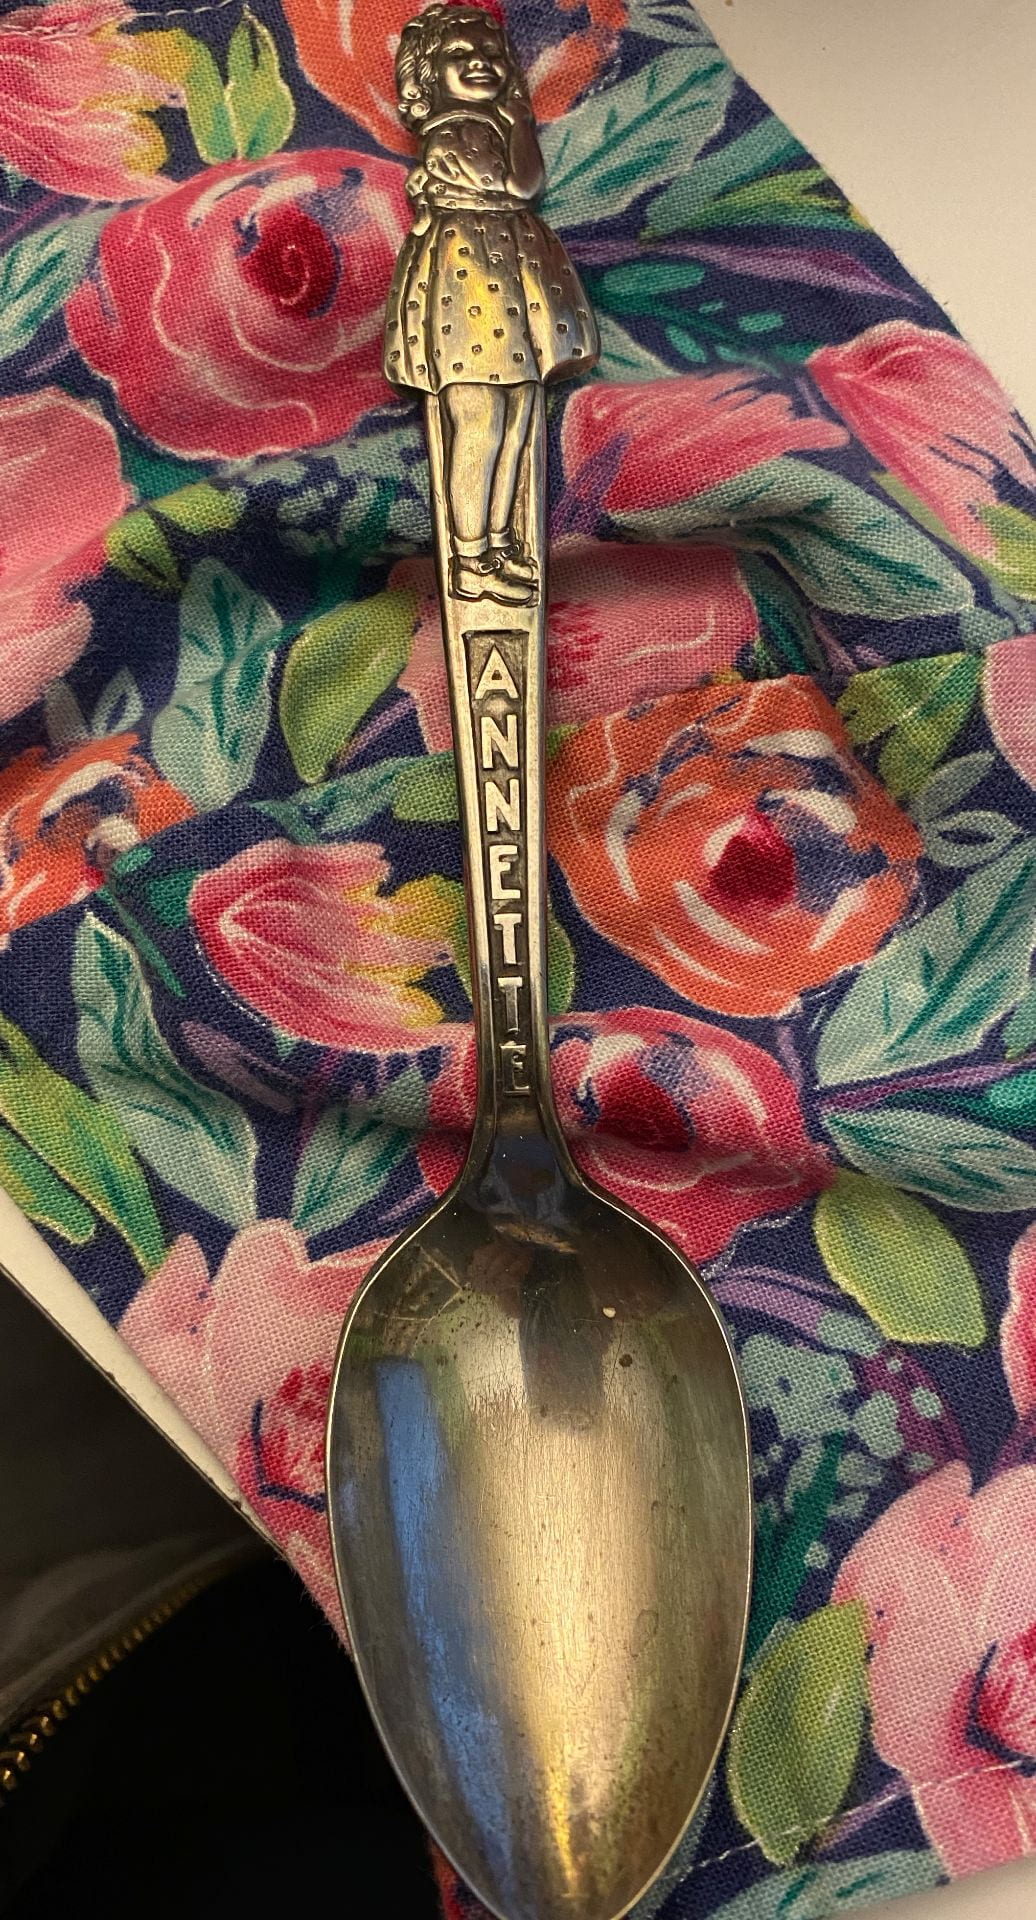
Quintuplets occur once in 55,000,000 births (without fertility treatments). The most famous set of quints to survive infancy were the Dionne sisters who were born in 1934. I have watched documentaries about these sisters. Unfortunately, the government feared the parents would exploit the quints and took custody of them. In the end, these girls were exploited by everyone. While they were at play each day, some 6,000 visitors stopped to watch them. Yikes! My mother-in-law shared a first name with one of the quints and was given this spoon at some point in her life. It was one of many souvenirs being sold. If you are interested, here is an article about the life of these five identical sisters.
 Unknown authorUnknown author, Public domain, via Wikimedia Commons
A well-known set of sextuplets are the Gosselin siblings. They were born in 2004 and became well-known when their parents agreed to be part of a reality tv show that chronicled what life was like with a set of six babies! It was a very popular show for a while, but it took a toll on the family. Must be difficult to have a camera recording so much of your life.
When the McCaughey septuplets were born in 1997, they received a lot of media attention. One of the more interesting letters they received was from the three surviving Dionne quintuplets. The Dionne sisters offered their congratulations, but also warned the parents to keep the children out of the public eye as much as possible to avoid what they themselves experienced.
The first confirmed set of octuplets was born in 1969. Unfortunately, all eight babies died within 13 hours. It wasn’t until 2009 that a full set of octuplets (Suleman) survived infancy. It illustrates how risky multiple births are, and yet also how the field of premature infant health care keeps improving.
With the birth of nonuplets to a couple in Mali, it appears another world record has been set. Interestingly enough, the couple and their doctors thought they were having septuplets. Apparently two of the babies were hidden during the ultrasounds.
As of June 9th I read of a woman in South Africa who gave birth to decuplets! Like the couple who thought they were having seven but had nine, this couple thought they were having eight and had ten! They were delivered at 29 weeks. Guinness World Records is the group that officially verifies these things and determines world records.
Numbered sets of legs/feet
If you want to group creatures by the number of legs/feet they have, you’ll work from this short list.
unipeds
bipeds
quadrupeds
pentapeds
octopus
centipedes
millipedes
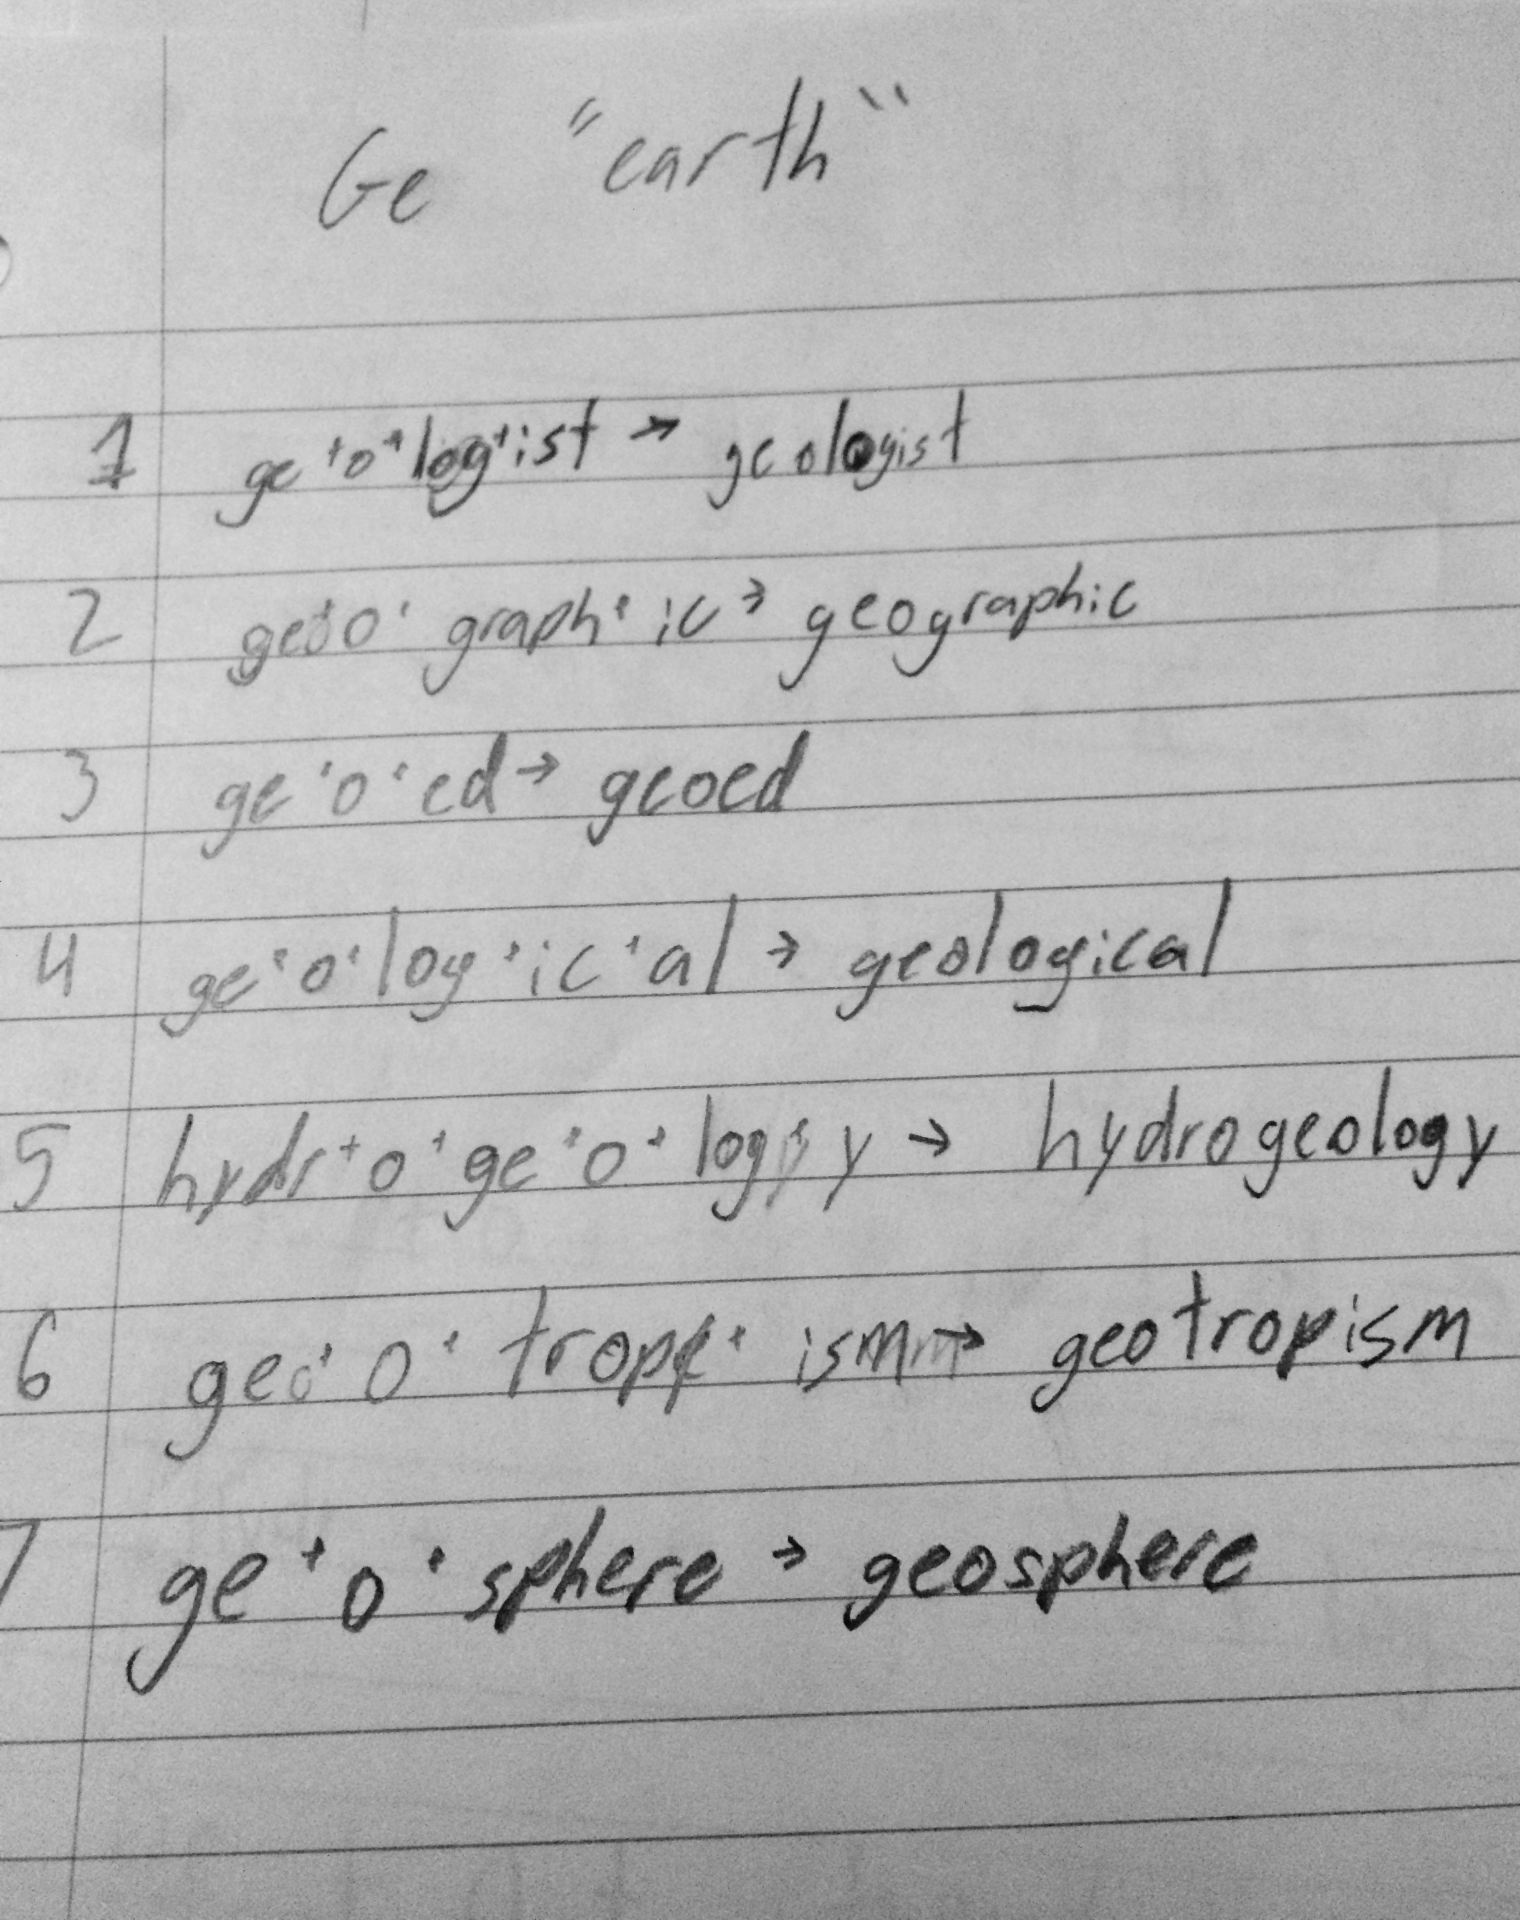
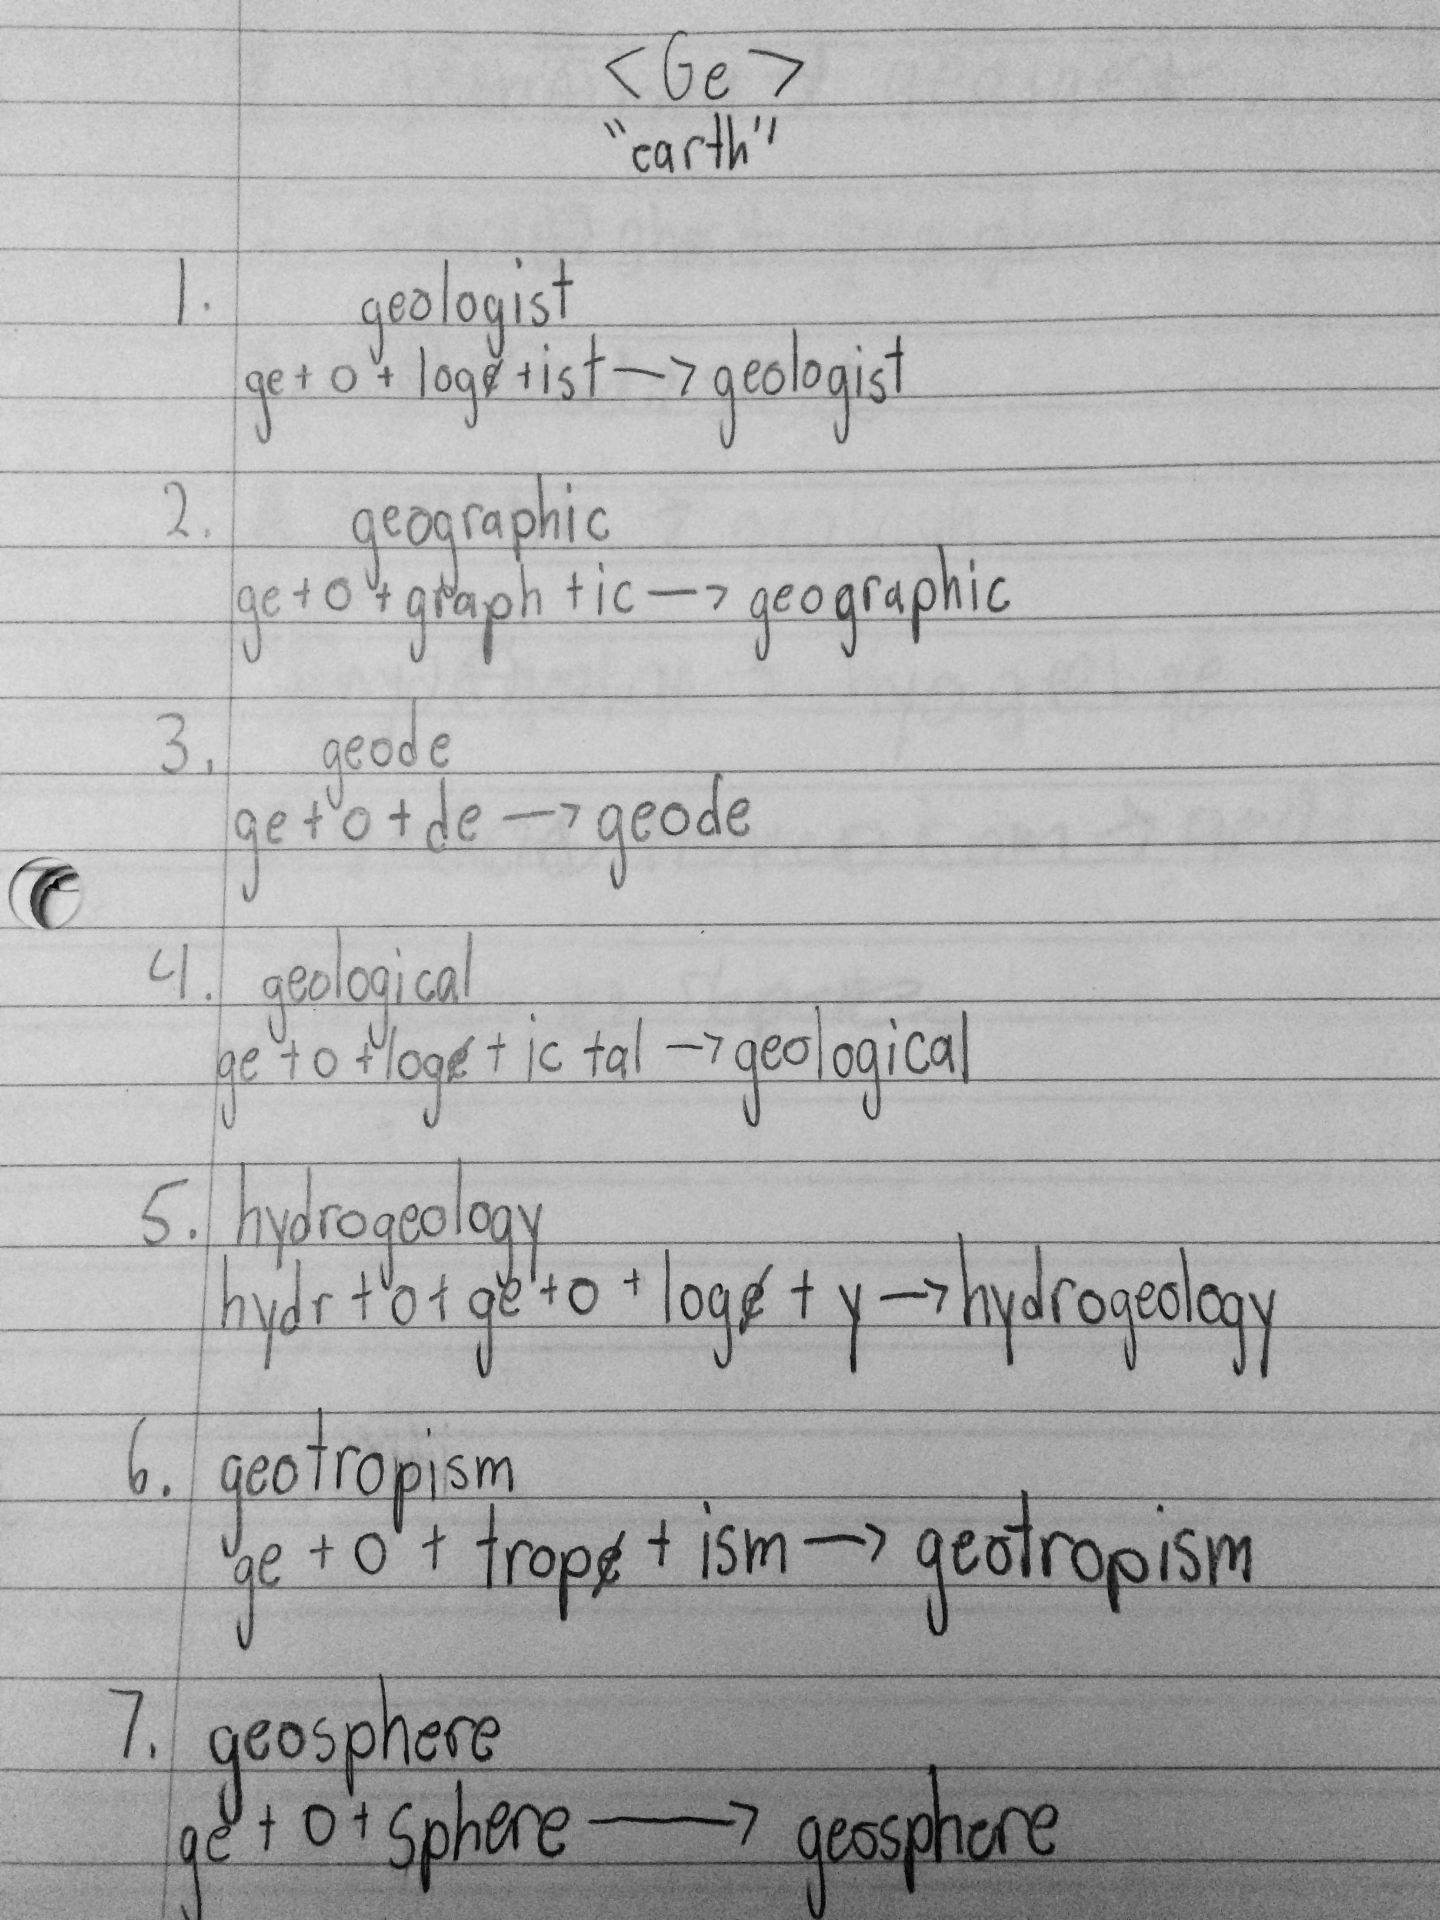
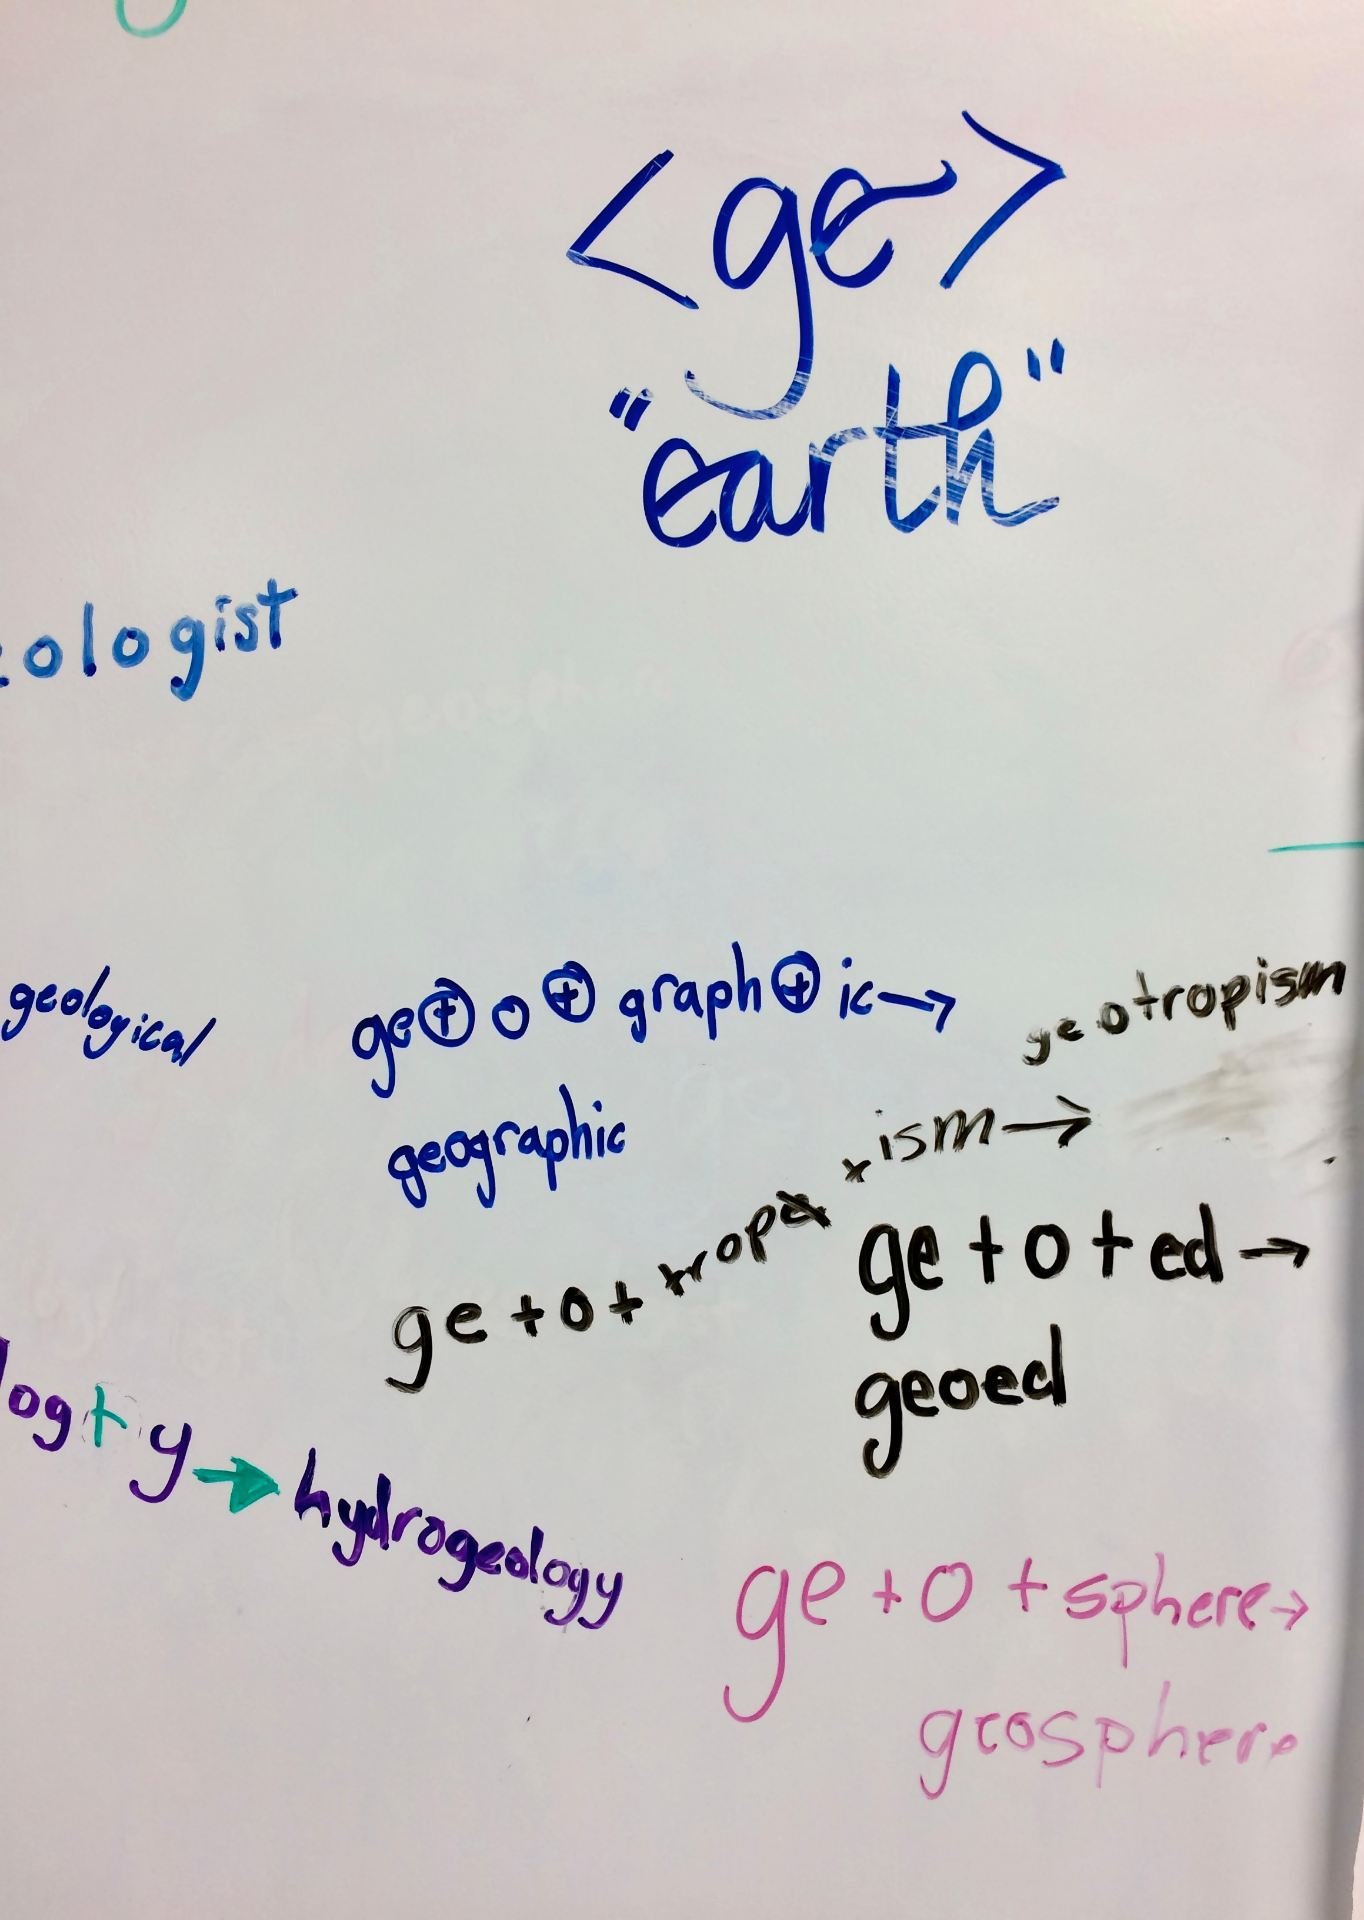
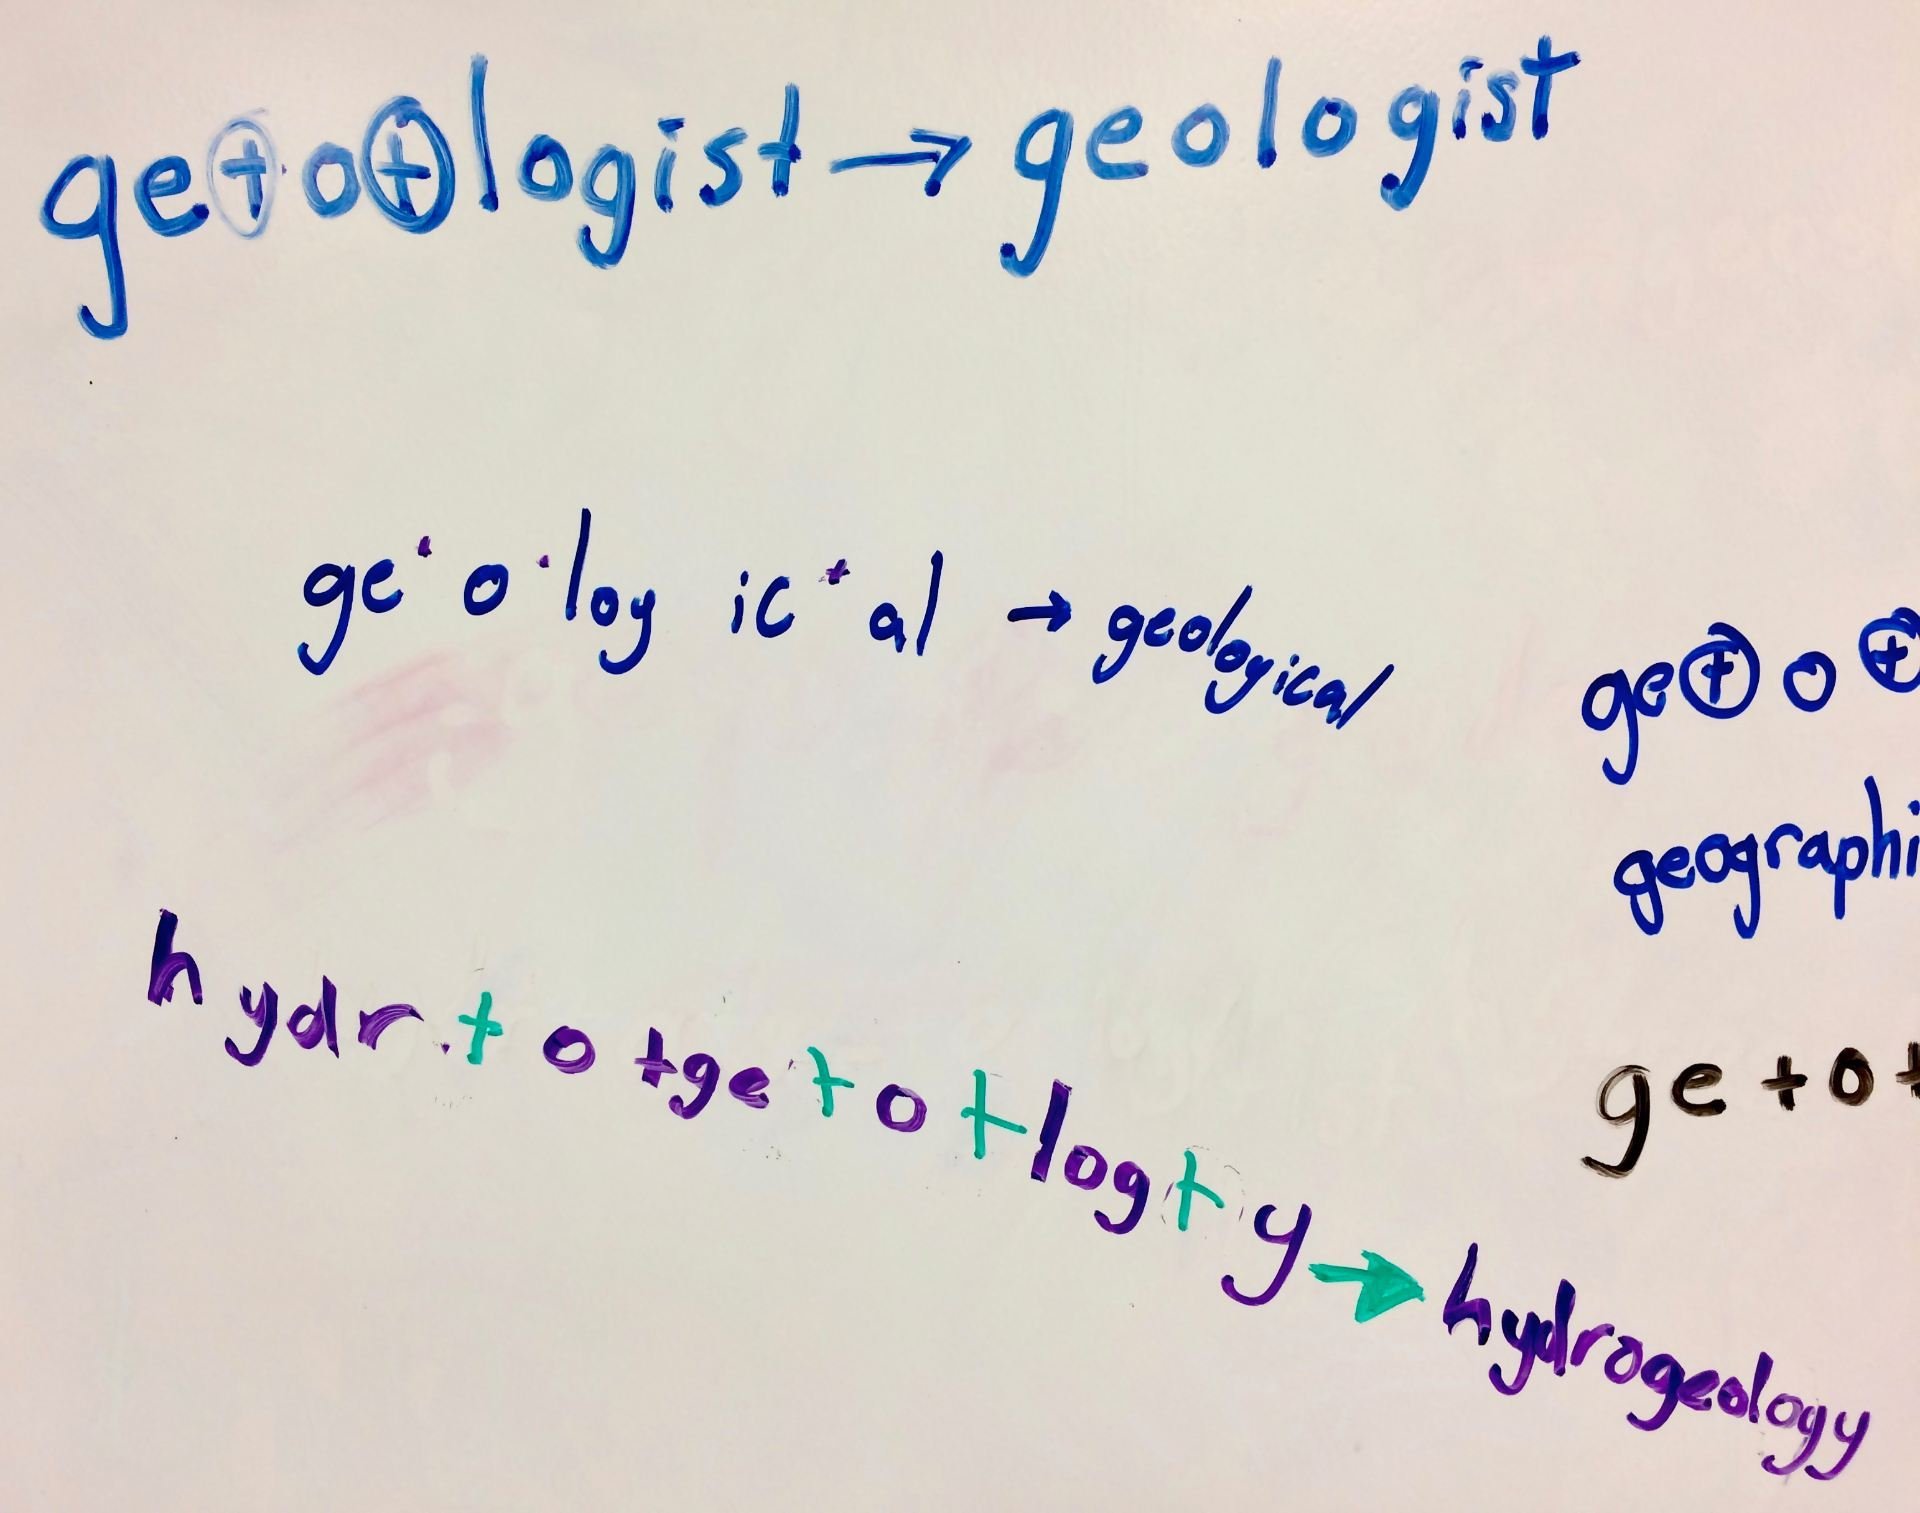
Snails and slugs are obviously unipeds. You can see the one foot they use to move with. The organisms that belong to this class Gastropoda were previously called univalves. That descriptive term referred to the fact that they have one valve or shell. The name Gastropoda is equally as descriptive and revealing. It comes from the Greek γαστήρ (gastér “stomach”) and Greek πούς (poús “foot”). Its stomach is positioned above its single foot.

Other unipeds are marine and freshwater mollusks, also known as bivalvia. I bet that after learning about univalves, you can hypothesize the meaning of ‘bivalvia!’ These are mollusks with shells that have two valves (hinged parts).

Tridacna gigas (Giant clam) in Aquarium Finisterrae (House of the Fishes), in Corunna, Galicia, Spain.
Much of the information in this section of the post is coming from Wikipedia which also has some interesting information about bipedalism. They describe it as “a means of moving forward by means of two legs and feet.” Picture a moving kangaroo or ostrich for a clear idea of an organism that uses bipedalism. Of course, humans are bipeds too! Some animals like bears and some lizards who are quadrupeds move bipedally when needing to move quickly or get to a food source. Can you picture it? Here’s a pretty cool video from National Geographic that shows a lizard running bipedally across the surface of the water!
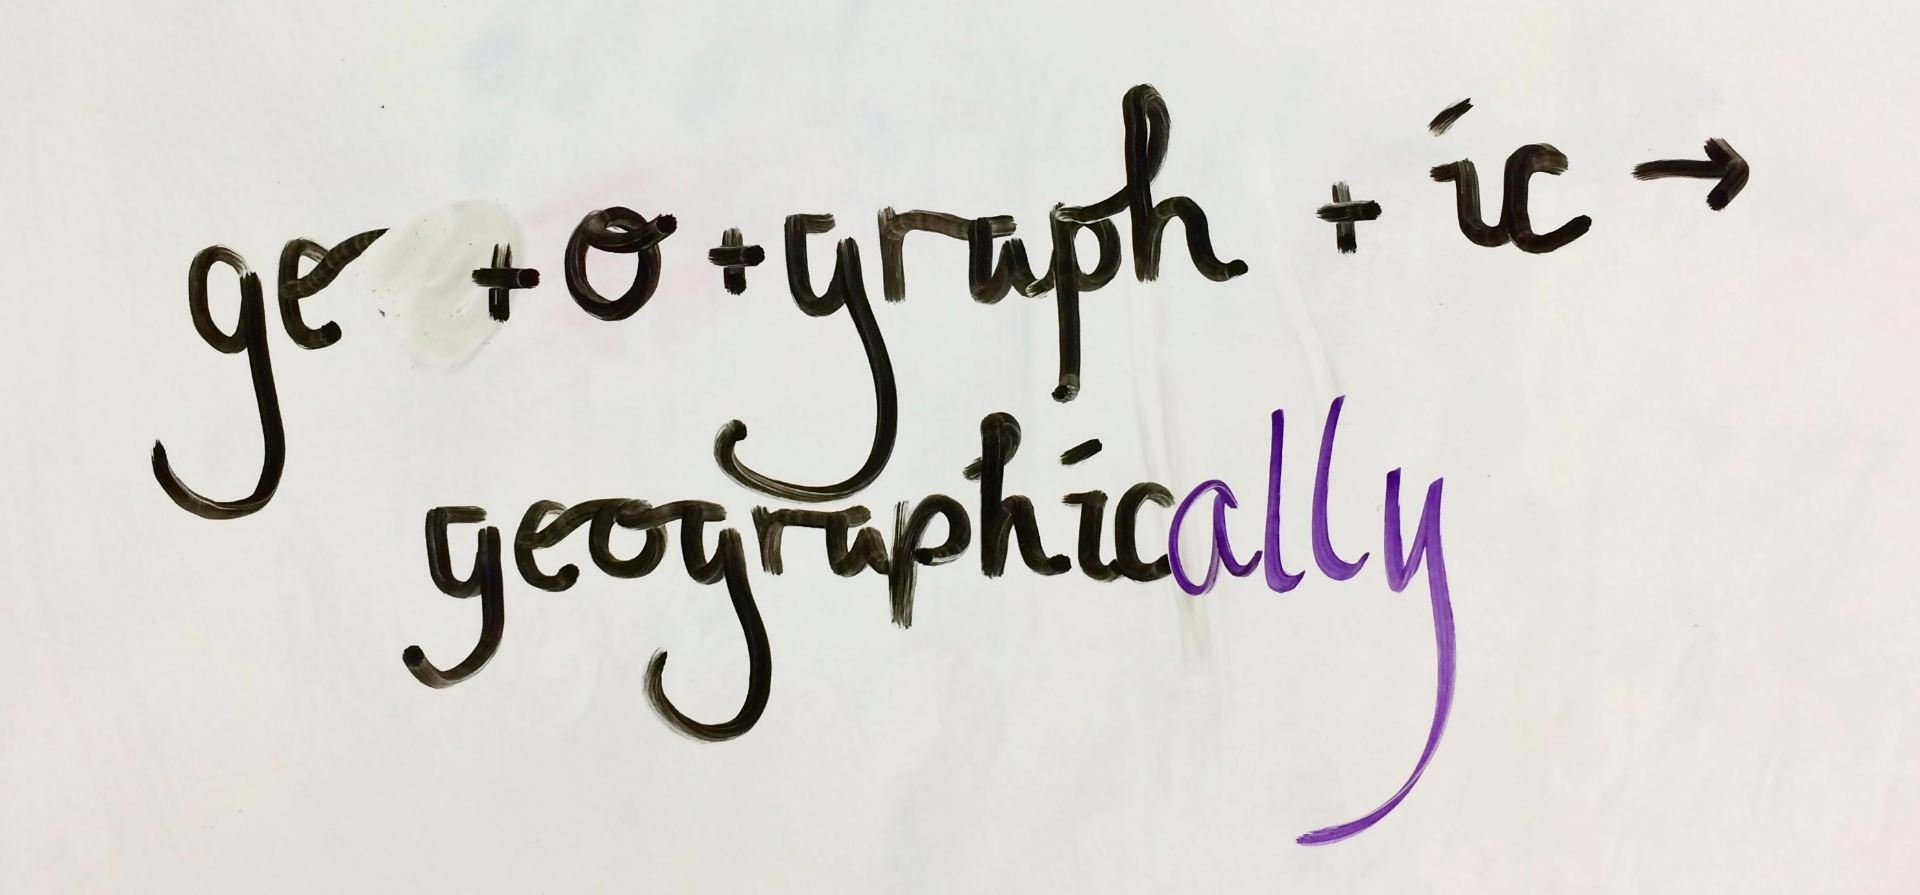
Isn’t it interesting to see the use of biped, bipedally, and bipedalism in the same paragraph? Once you understand the structure of biped (<bi + ped>), you can also understand the suffixes that have been added to change how the word might be used. As an adverb, we would use <bi + ped + al + ly –> bipedally> and as a noun describing the condition of moving on two feet we would use <bi + ped + al + ism>.
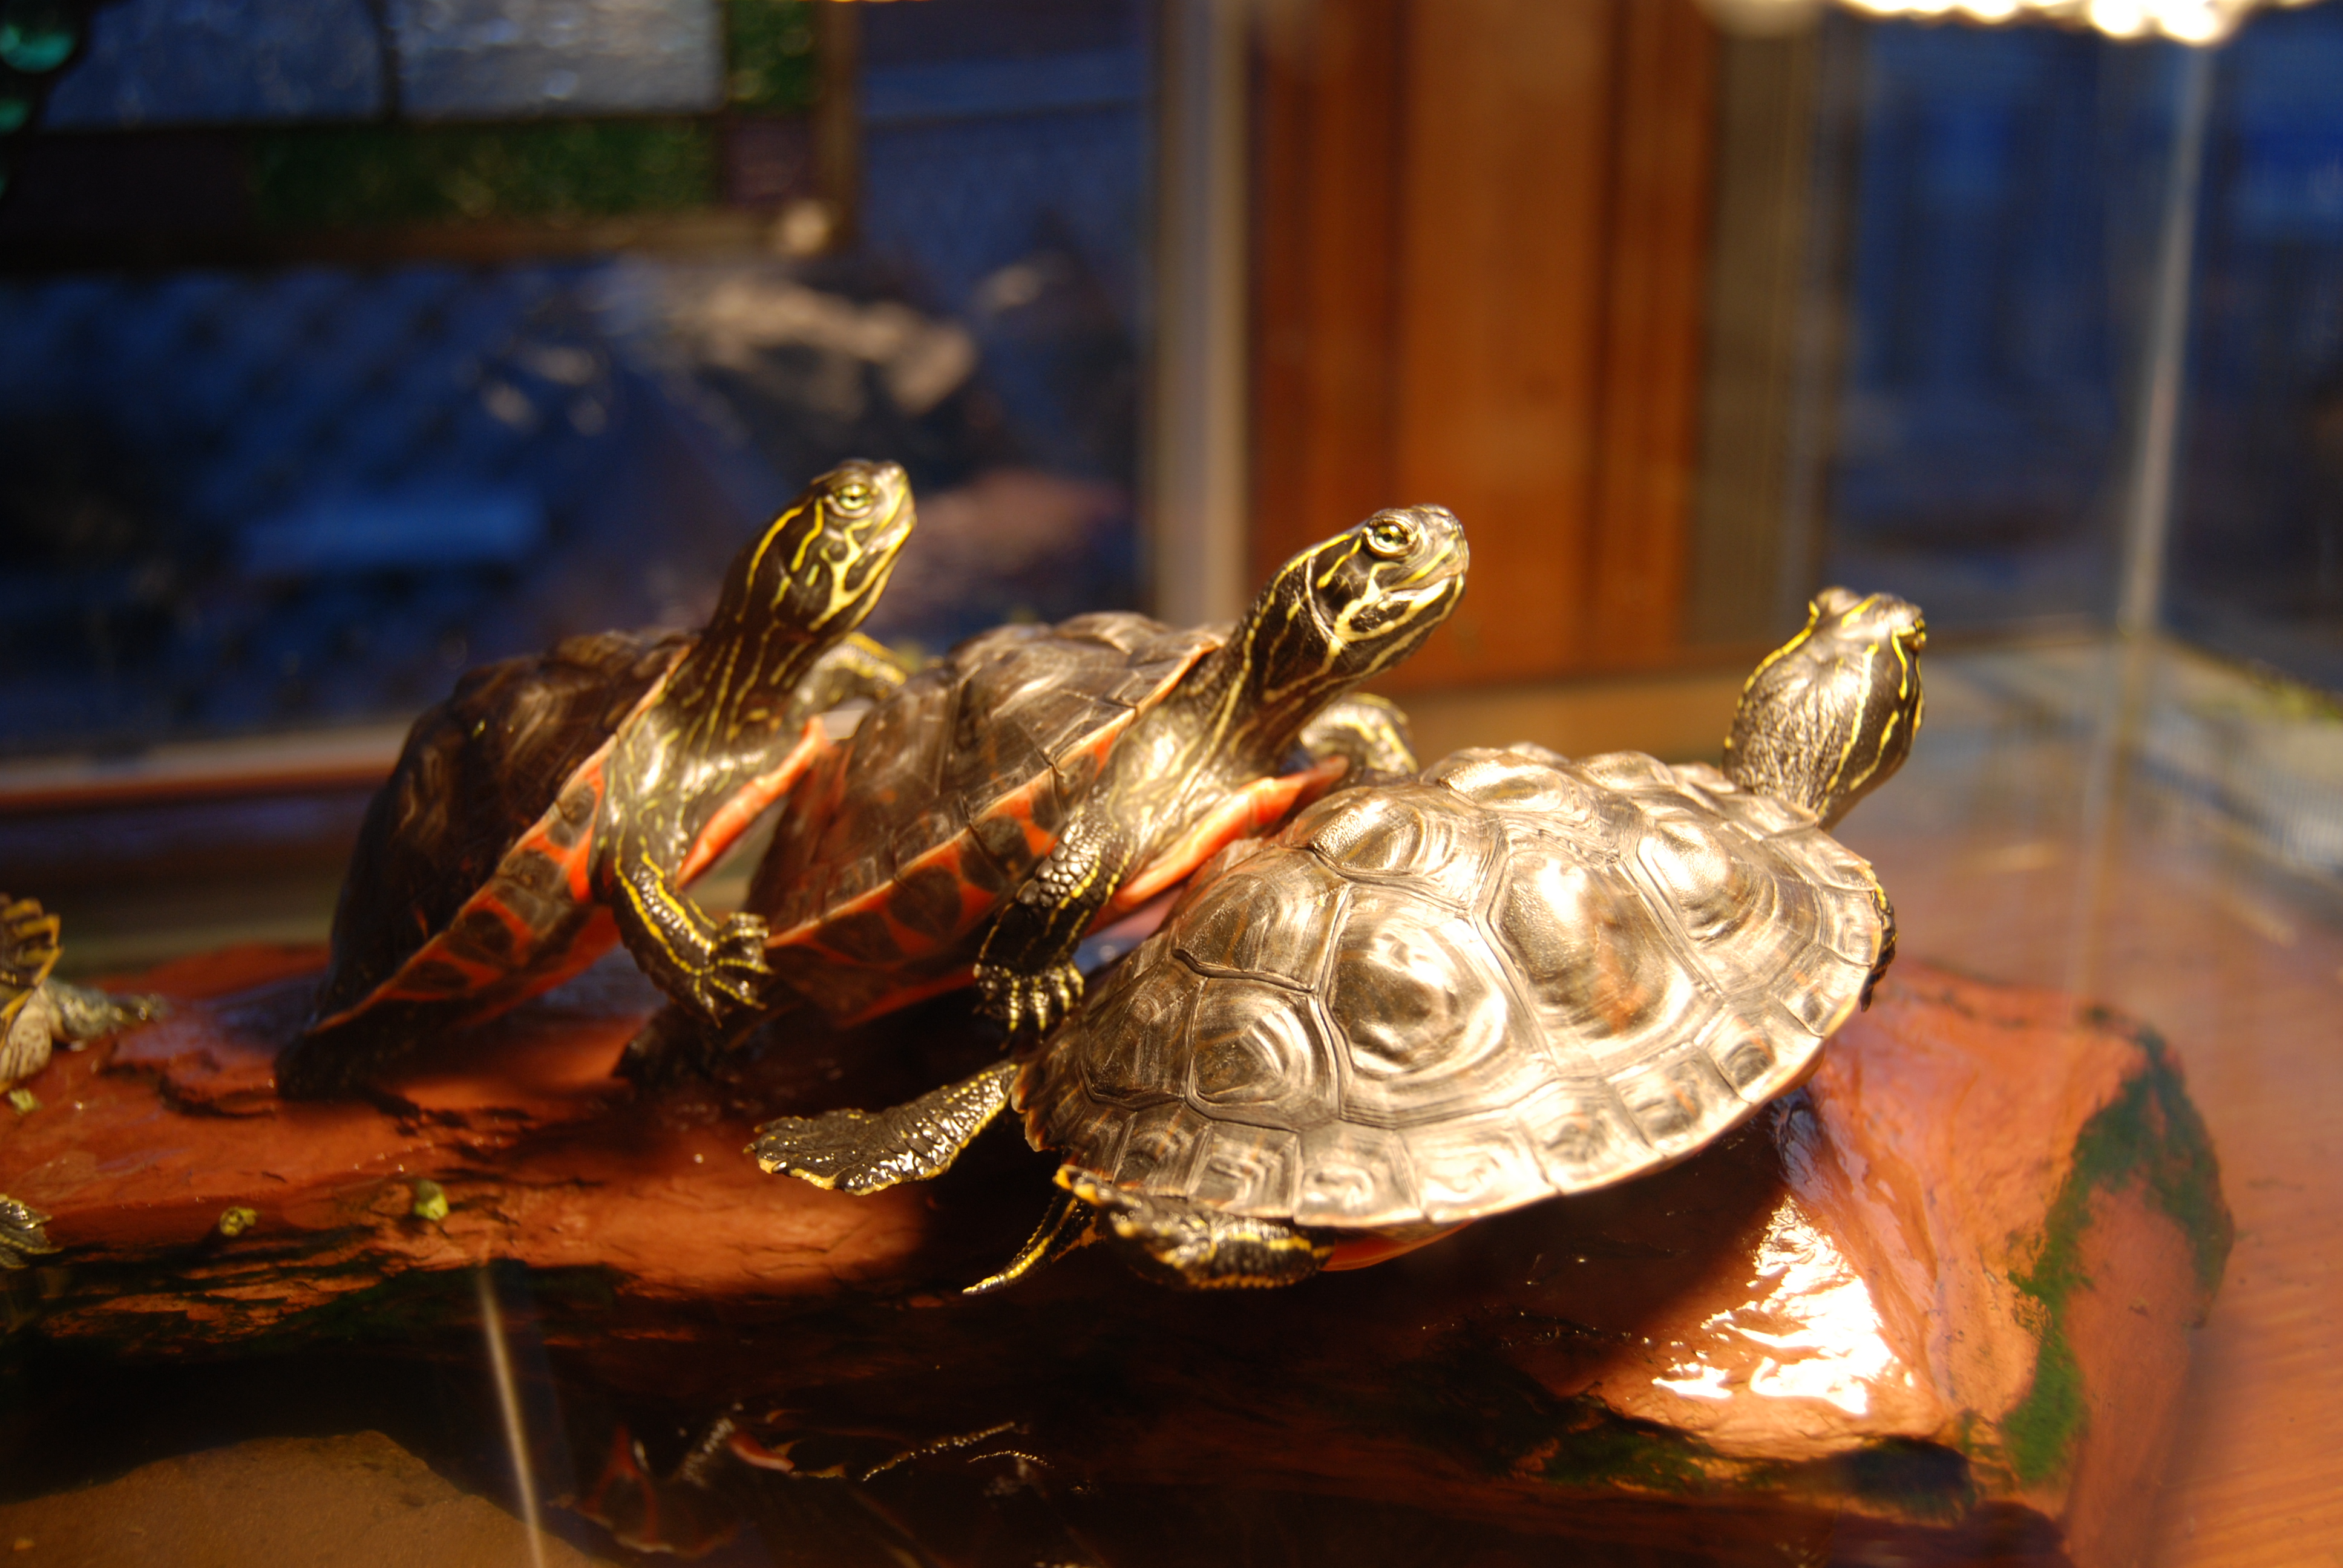
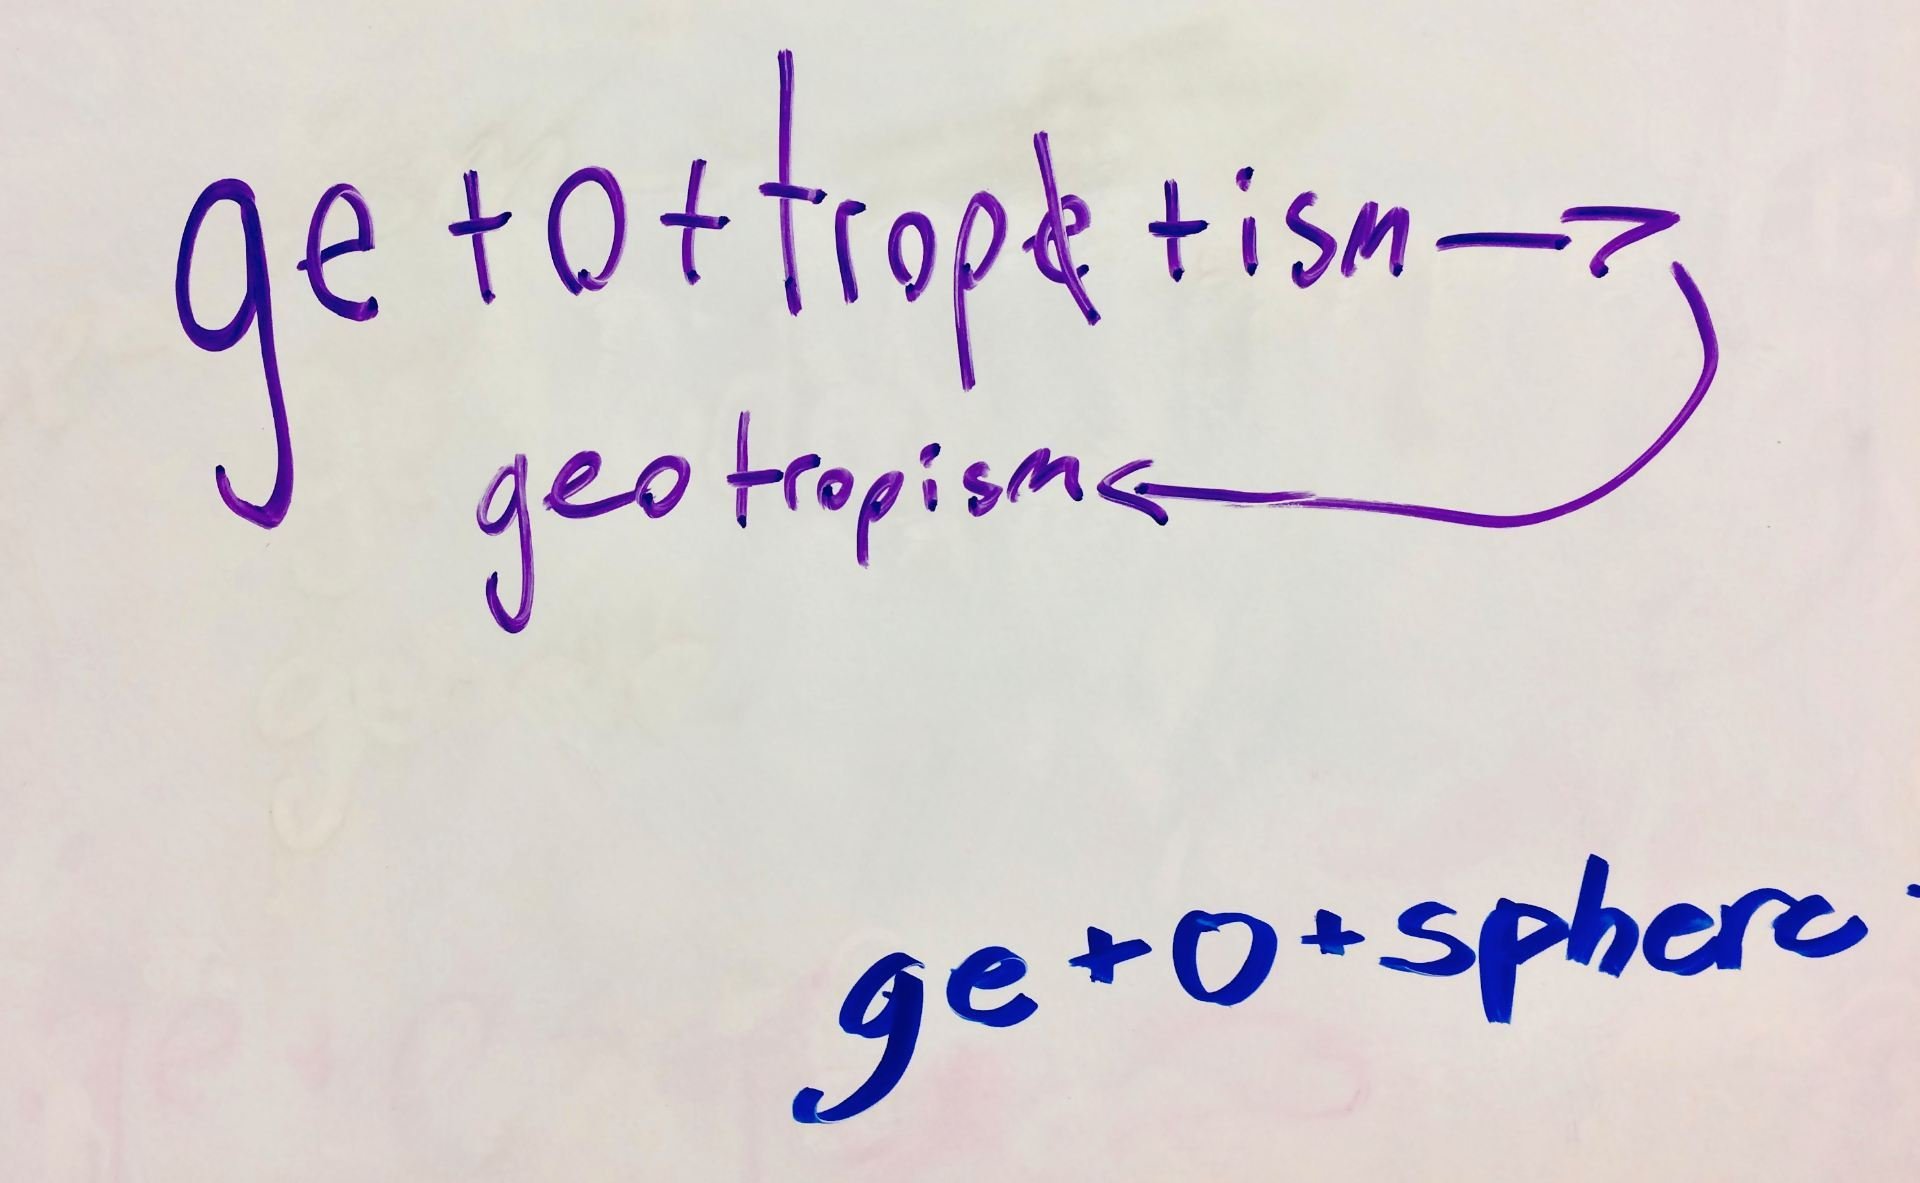
If bipedalism is a means of moving by the use of two legs, then quadrupedalism is a means of moving by the use of four legs to bear the weight of the body. The word ‘quadruped’ can also refer to a machine. It simply means anything “that usually maintains a four-legged posture and moves using all four limbs.” Most often we use this word to refer to terrestrial mammals and reptiles, but there are also aquatic quadrupeds such as turtles, amphibians, and pinnipeds. If you’re wondering what a pinniped is, I’m right there with you! At Etymonline, the entry provides us with this information.
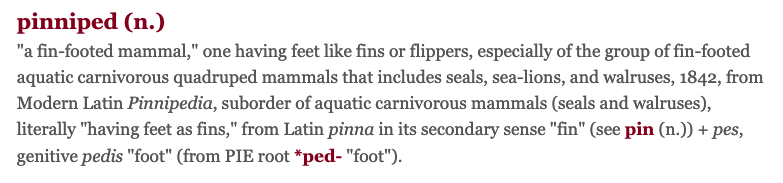
Word investigations lead to such interesting unintended discoveries, don’t they? So seals, sea-lions, and walruses are quadrupeds in a similar fashion to zebras, dogs, and giraffe’s! A look at the entry for ‘quadruped’ reveals more information. This word is from Latin quadrupes “four-footed, on all fours.” In contrast to the word ‘quadruped,’ there is also the word ‘quadrumane.’ That refers to an animal that is four handed or with four hands and feet with opposable digits. Merriam-Webster describes quadrumanes as having hand-shaped feet. I bet you are already picturing monkeys or other animals that are primates. This word was once used more commonly in the field of zoology, even being the name of the order of mammals Quadrumana, which included non-human primates. It is now considered obsolete. As an adjective, someone might refer to another creature as quadrumanous. In that instance, they are describing that creature as ape-like.
 By Dave59 at the English-language Wikipedia, CC BY-SA 3.0
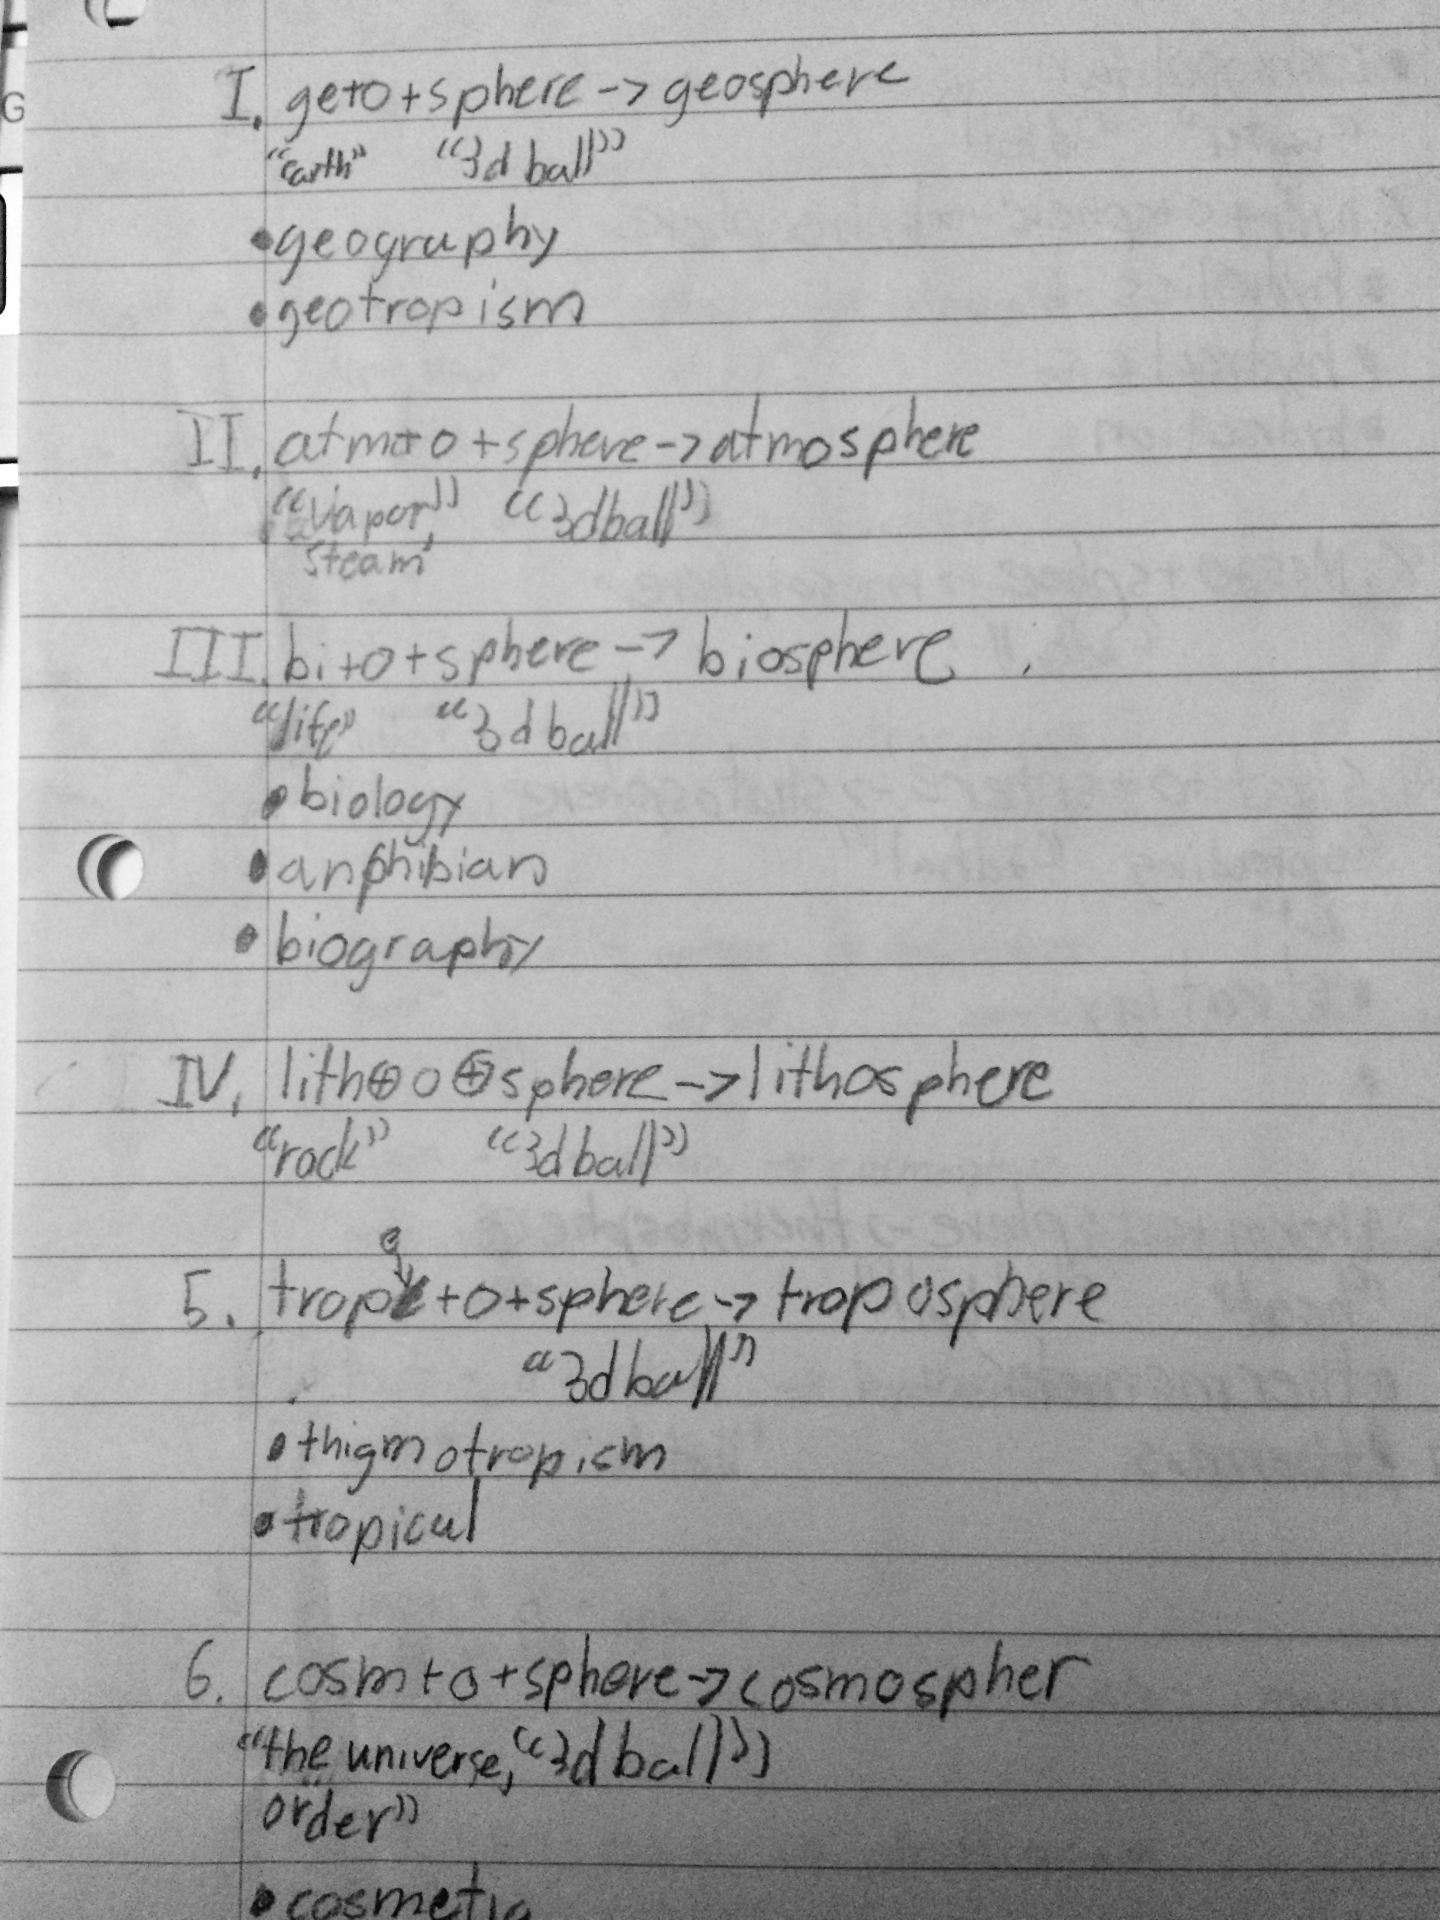
While reading about quadrupeds at Wikipedia, I learned that while the word ‘tetrapod’ literally means four-footed in the same way that quadruped does, there is a very specific difference between how the two words are used. When comparing the structure and etymology of these two words, you may have guessed that ‘quadruped’ has two elements from Latin (quandri- “four” and pes “foot”), and ‘tetrapod’ has two elements from Greek (τετρα “four” and πούς “foot”). Tetrapods descended from a four-limbed ancestor. Quadrupeds use all four limbs to walk/run.
“The distinction between quadrupeds and tetrapods is important in evolutionary biology, particularly in the context of tetrapods whose limbs have adapted to other roles (e.g., hands in the case of humans, wings in the case of birds, and fins in the case of whales). All of these animals are tetrapods, but none is a quadruped. Even snakes, whose limbs have become vestigial or lost entirely, are nevertheless tetrapods.”
It wasn’t until I published this post that I heard about pentapeds. It is one of the reasons I am so grateful for the broad audience my posts reach! Not having much exposure to kangaroos, I always picture them as moving fast and in that case moving bipedally. But check out this video of the walking movement of a kangaroo. Its tail is like another foot!
Another fascinating creature that I initially forgot to mention is the octopus, an eight limbed mollusc. There are 300 species of octopuses. According to Wikipedia, the largest octopus ever recorded weighed 600 pounds with an arm span of 30 feet! It was a giant Pacific octopus. The octopus wolfi, on the other hand is the smallest known. It weighs less than 1 gram and is about 1 inch in size.
 albert kok, CC BY-SA 3.0 <https://creativecommons.org/licenses/by-sa/3.0>, via Wikimedia Commons
There is a character in the movie Finding Dory called Hank the septapus. Apparently, Hank was born with eight limbs, but one was pulled off by a human child who played too roughly. So in a sense, he might now be referred to as a septapus. But the reality of it is that he is an octopus. He was born with eight limbs, and if one was cut off, another would grow in its place. (I hope I’m not ruining the movie for anyone.) I found this information at Scientific American. It is quite a fascinating article!
I bet you think you know about centipedes. Well, at least you think you know how many legs they have. According to Wikipedia, centipedes always have an odd number of legs. That means they would never have exactly 100! Surprising, isn’t it? In fact they can have anywhere from 30 to 354 legs! I bet they were named centipedes because it seemed like they had a hundred legs when they were seen moving. A few more interesting facts are that they are carnivorous and range in length from a few millimeters to 12 inches. Wow.

The name ‘millipede’ comes from Latin and means “1000 feet.” If you’re going to guess that they don’t actually have one thousand feet based on what you just learned about centipedes, you’d be correct. There is one species of millipede (Illacme plenipes) that holds the record for having 750 legs. That is more than any other animal in the world! Millipedes are detritivores (eat dead plant matter) and are found in central California.
Grouped by months
There are four months in our year that also contain one of these word elements that indicate a number.
September
October
November
December
Many people might guess that October might have something to do with “eight,” but they’re not sure what. Well, it used to be the eighth month, that’s what! In Ancient Rome, March was considered the first month of the year. Interestingly enough, July was originally named Quintilis “fifth” and August was originally named Sextillia “sixth.” While March, April, May, and June were named with other ideas in mind, July, August, September, October, November, and December were named for their order. January and February were added to the end .
Julius Caesar brought about changes to the calendar when he aligned it to the earth’s revolutions around the sun. January and February were moved to the beginning of the calendar. This caused some of the months to be out of alignment with their numbered names. That’s why September, October, November, and December are no longer the 7th, 8th, 9th, and 10th months.
It was in remembrance of Julius Caesar (and to honor him for his adjustments to the Julian calendar) that Quintilis was renamed as July. In a similar way, the month of Sextillia was renamed August to honor Augustus Caesar, the first Roman emperor.
Final adjustments to the calendar were made in 1582 by Pope Gregory XIII who corrected some inaccuracies with the Julian calendar. We refer to the calendar we use today as the Gregorian calendar! Look at these two links (Wonderopolis and The Old Farmer’s Almanac) for more information about the naming of the months that you and your students can read together.
Grouped by millions
The following is a list that I have purposely shared with my students each year. There are so many great morphemes to know here! Let’s start with the word ‘million.’ After all, all the rest of these words share part of its spelling. According to Etymonline, it was first attested in the late 14c. At that time it was spelled milioun and used to mean “a thousand thousands.” Further back it was from Old French and spelled million. Further back yet it was from Italian millione and literally meant “a great thousand.” And the furthest back ancestor we find is Latin mille. You can see that the structure would be <mille/ + ion>. According to the Century Dictionary, “The French, who like other northern peoples, took most if not all their knowledge of modern or Arabic arithmetic from the Italians.” (I found that quote at Etymonline in the entry for ‘billion’).
Now when you look at the entry for ‘billion,’ you see that it was created from Latin <bi> “two” and million. When you look at the entry for ‘trillion,’ you see that it was created from Latin <tri> “three” and million. It is described as the third power of million. There is a pattern developing here. we can see the structure of ‘million,’ but can’t see the same structure in ‘billion’ and ‘trillion.’ Interesting, isn’t it? Every once in a while I come across words like this that are modeled on another spelling which makes them hard to analyze on their own. We can know how they came to be that way, but we can’t analyze them as we might like to. Instead, in a list like the following, we might underline the morphemic element that indicates a number. An example would be to underline the <quint> in ‘quintillion’ and mark that it means “five.”
Families of million (1-20)
million
billion
trillion
quadrillion
quintillion
sextillion
septillion
octillion
nonillion
decillion
undecillion
duodecillion
tredecillion
quattuordecillion
quindecillion
sexdecillion
septendecillion
octodecillion
novemdecillion
vigintillion
The following link takes you to Sbiis Saibian’s Large Number Site. It is a web book on large numbers. The link takes you to the specific chapter called “The -illions Series.” I found that this chapter thoroughly tells the story of large numbers beginning with ‘million.’ I found much of the same information in my research, so I trust that this information is accurate. What’s nice is that this author has the story, along with the different versions of what to call the numbers larger than million all in one place! It’s quite fascinating, and I encourage you to take a look! The part of the chapter that deals with how these numbers came to have these names is under the the article 2.4.2 – Origin & Development of the -illions . Here’s a brief excerpt to whet your appetite!
[The term “million” doesn’t seem to exist at any time before the 13th century (1200’s). Apparently it is an augmented form of the latin word “mille” meaning thousand. By dropping the e and adding the -ion as a suffix one could translate “million” as literally “Great thousand”. It is not known who first coined this term. It was used sparingly in the centuries to follow and was sometimes regarded as a kind of slang and not legitimate language (perhaps much the same way neolisms today are regarded as unofficial ), and writers more often than not preferred the non-ambiguous “thousand thousand.”]
A particularly interesting fact is that the list doesn’t continue beyond the 20th family of million. But then, it is actually quite rare that any of these number names are used with any regularity beyond the use of trillion!
Grouped by shape
The following list is no doubt very familiar to anyone who has studied geometry. It is a list that I’m sure many school children have seen before and perhaps struggled with figuring out how to remember what each word means. To make that task easier, I usually put it side by side with the list you were just reading about – the list of numbers beyond millions. It is so interesting when you compare the two lists. Instead of me pointing out similarities and differences, the students can do it for themselves. I’ve made a chart so that you can see at a glance how all the numbered groups I’ve mentioned relate to one another in meaning. You’ll find the chart below this list of shapes.
What I have found interesting in looking at the list of shapes is that the first one (triangle) pretty clearly refers to a shape with three angles. The second shape listed is a quadrilateral which in math books is also referred to as a quadrangle. But why the two names? The word quadrangle originated in Latin as quandrangulum and was used to mean a “four-sided figure.” What’s interesting to me is that the word literally means “four angles” and yet it is defined as a “four sided figure”. Perhaps it is nothing to get hung up on since a four-sided figure will have four angles and a shape with four angles will have four sides. The word quadrilateral originated in Latin as quadrilaterus and was used to mean “figure formed of four straight lines.” That makes sense to me because I’ve seen ‘lateral’ in other words and it has always had something to do with “side.”
Sometimes the word is used generally. In the following pictures you are looking at a lateral view (side view) of a goat skeleton and also a building.
 Wilhelm Ellenberger and Hermann Baum, Public domain, via Wikimedia Commons
 ProtoplasmaKid, CC BY-SA 4.0 <https://creativecommons.org/licenses/by-sa/4.0>, via Wikimedia Commons
Other times the use of lateral is more specific. Notice the darkly pigmented lateral line on this fish? Many fish have a lateral line.
 Brian Gratwicke, CC BY 2.0 <https://creativecommons.org/licenses/by/2.0>, via Wikimedia Commons
Here is an example of a lateral pass in football. According to Wikipedia, “The ball carrier throws the football to a teammate in a direction parallel to or away from the opponents’ goal line.” So the ball is moved to one side or the other. In Canadian football this is more commonly known as an onside pass and in American football it is known as a backward pass.
 U.S. Navy photo by Chief Warrant Officer 4 Seth Rossman., Public domain, via Wikimedia Commons
Getting back to the mathematical use of these words, I also recall seeing ‘equilateral’ in math texts that I have used with children. This indicates that a shape has equal sides. And just as I have seen quadrilateral and quadrangle referring to the same shape, I have also see equilateral and equiangular referring to the same shape. Again, when we have a shape with equal sides, it will have equal angles.
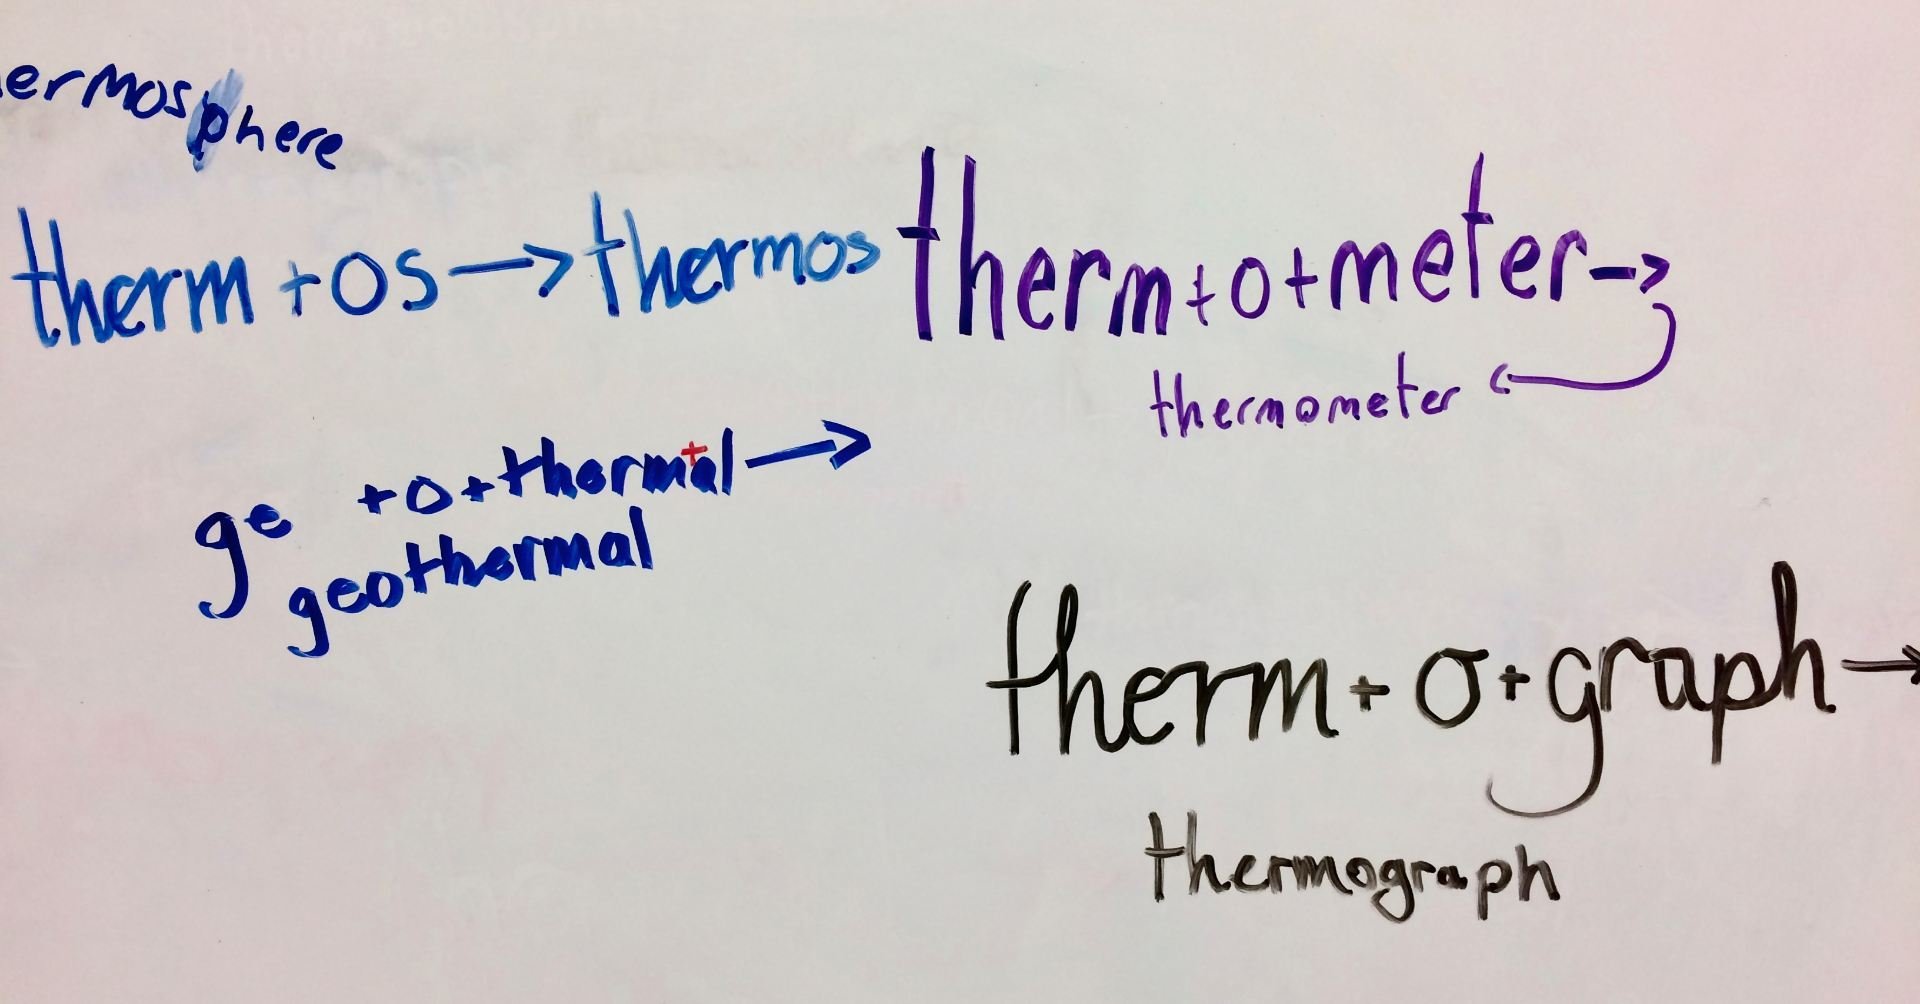
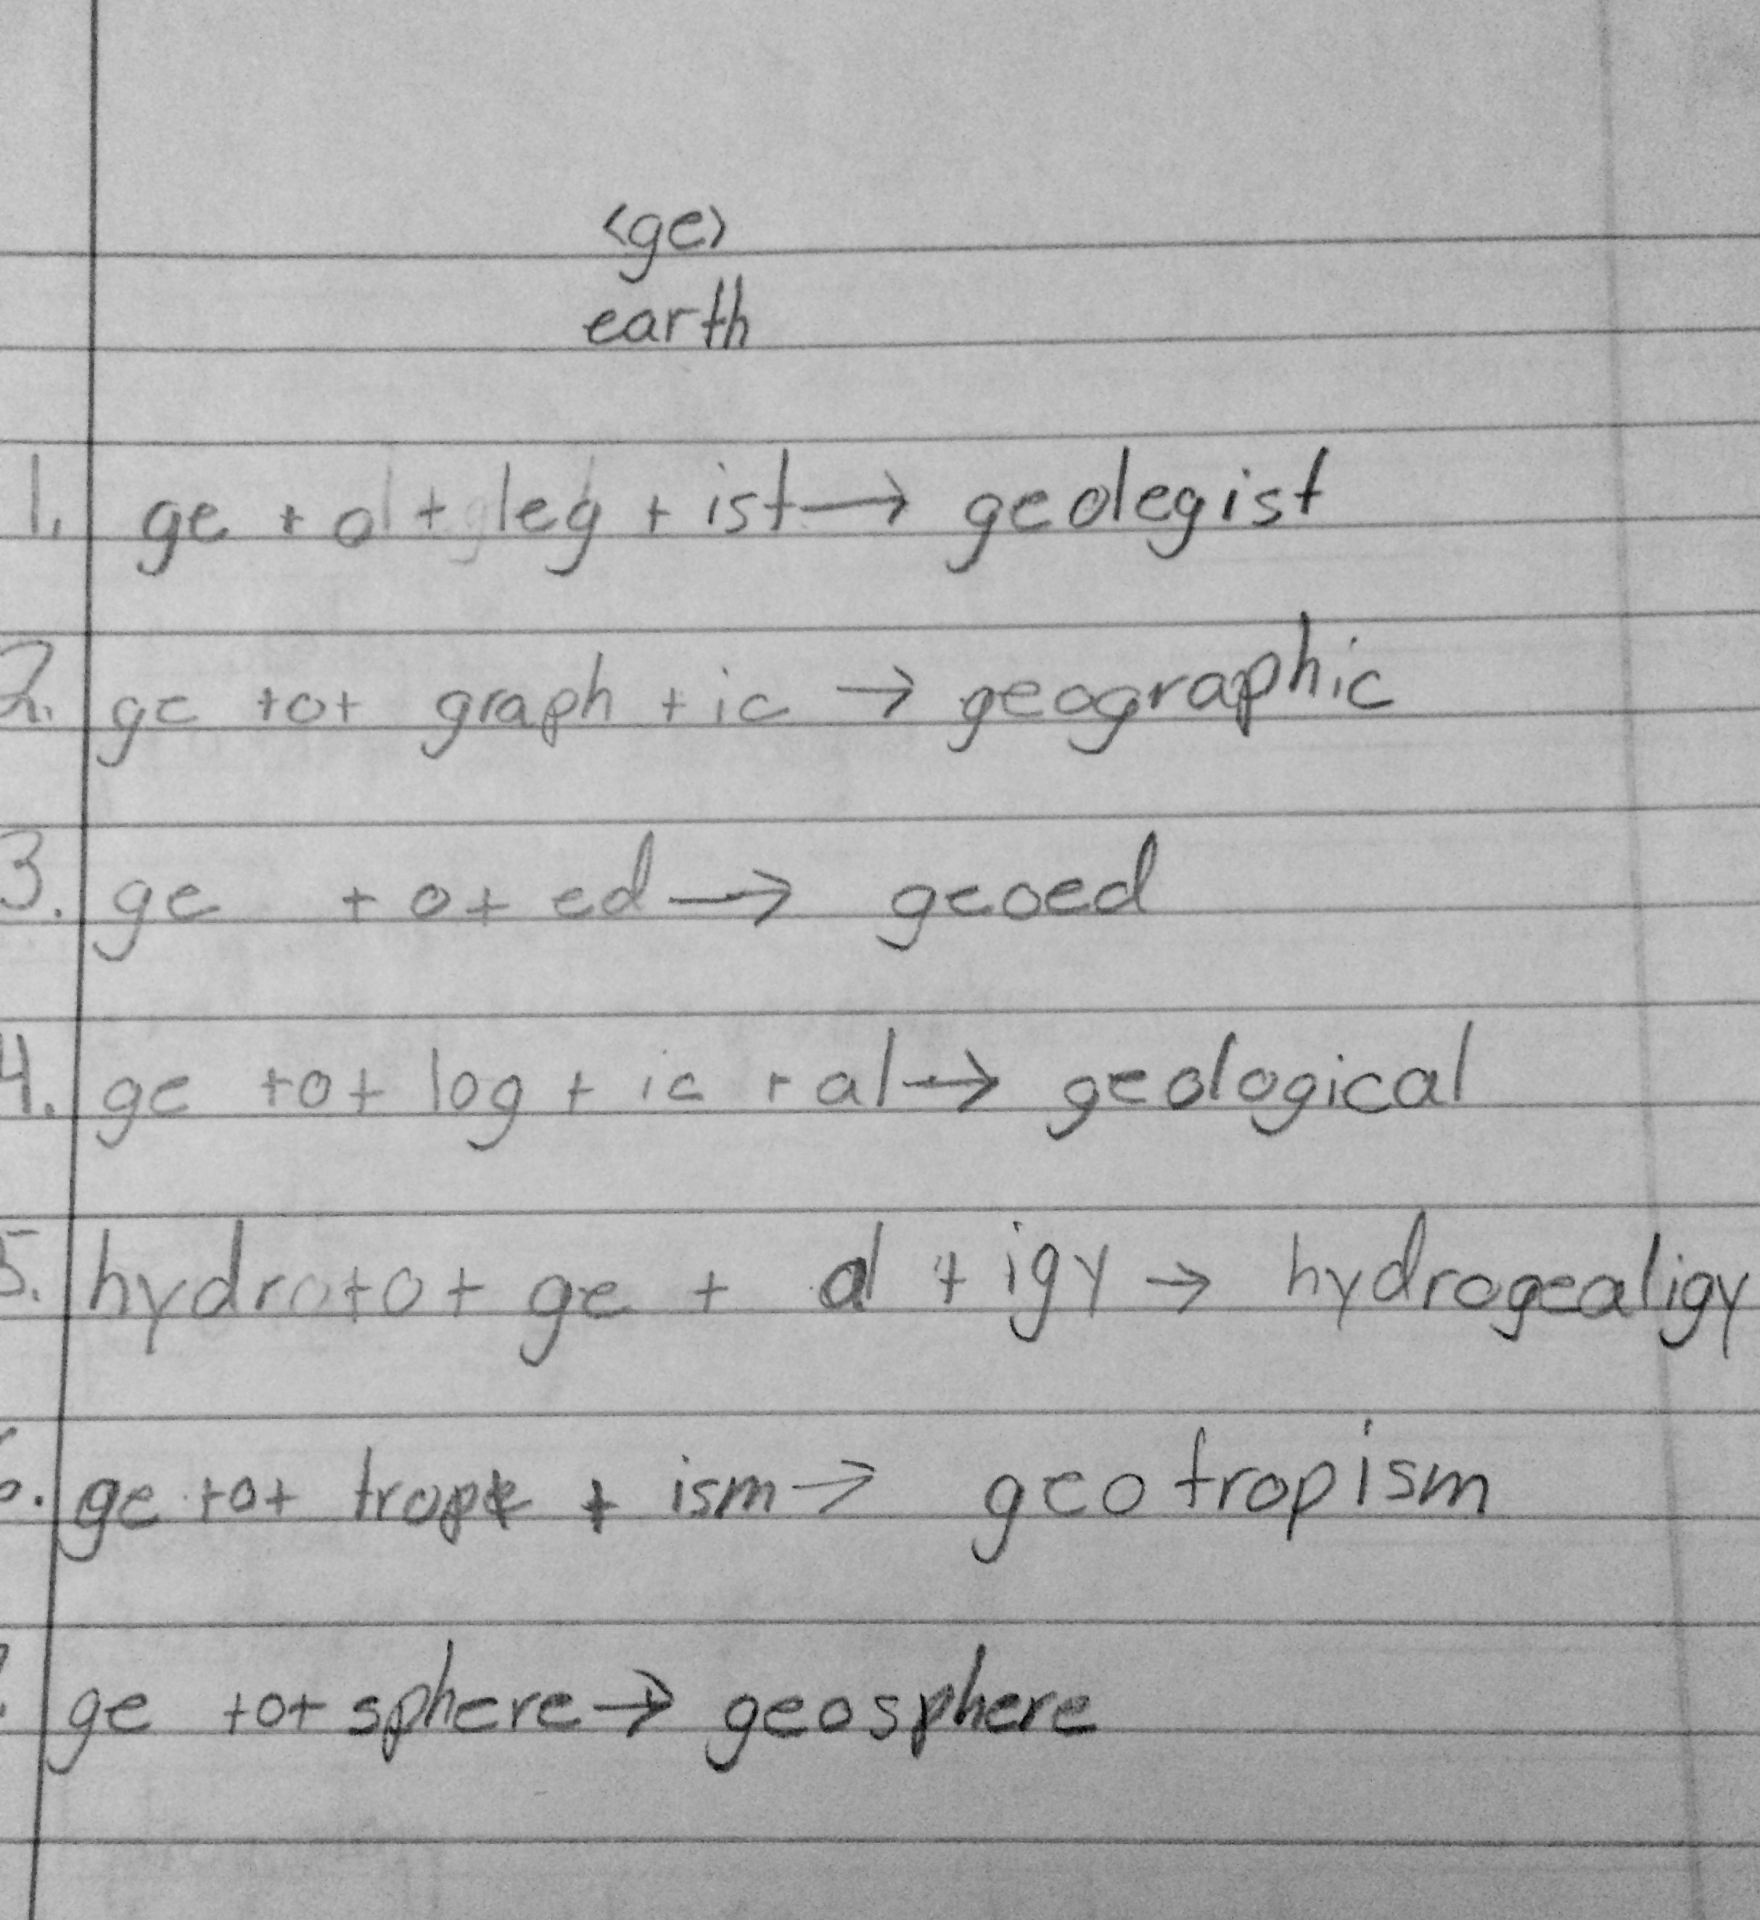
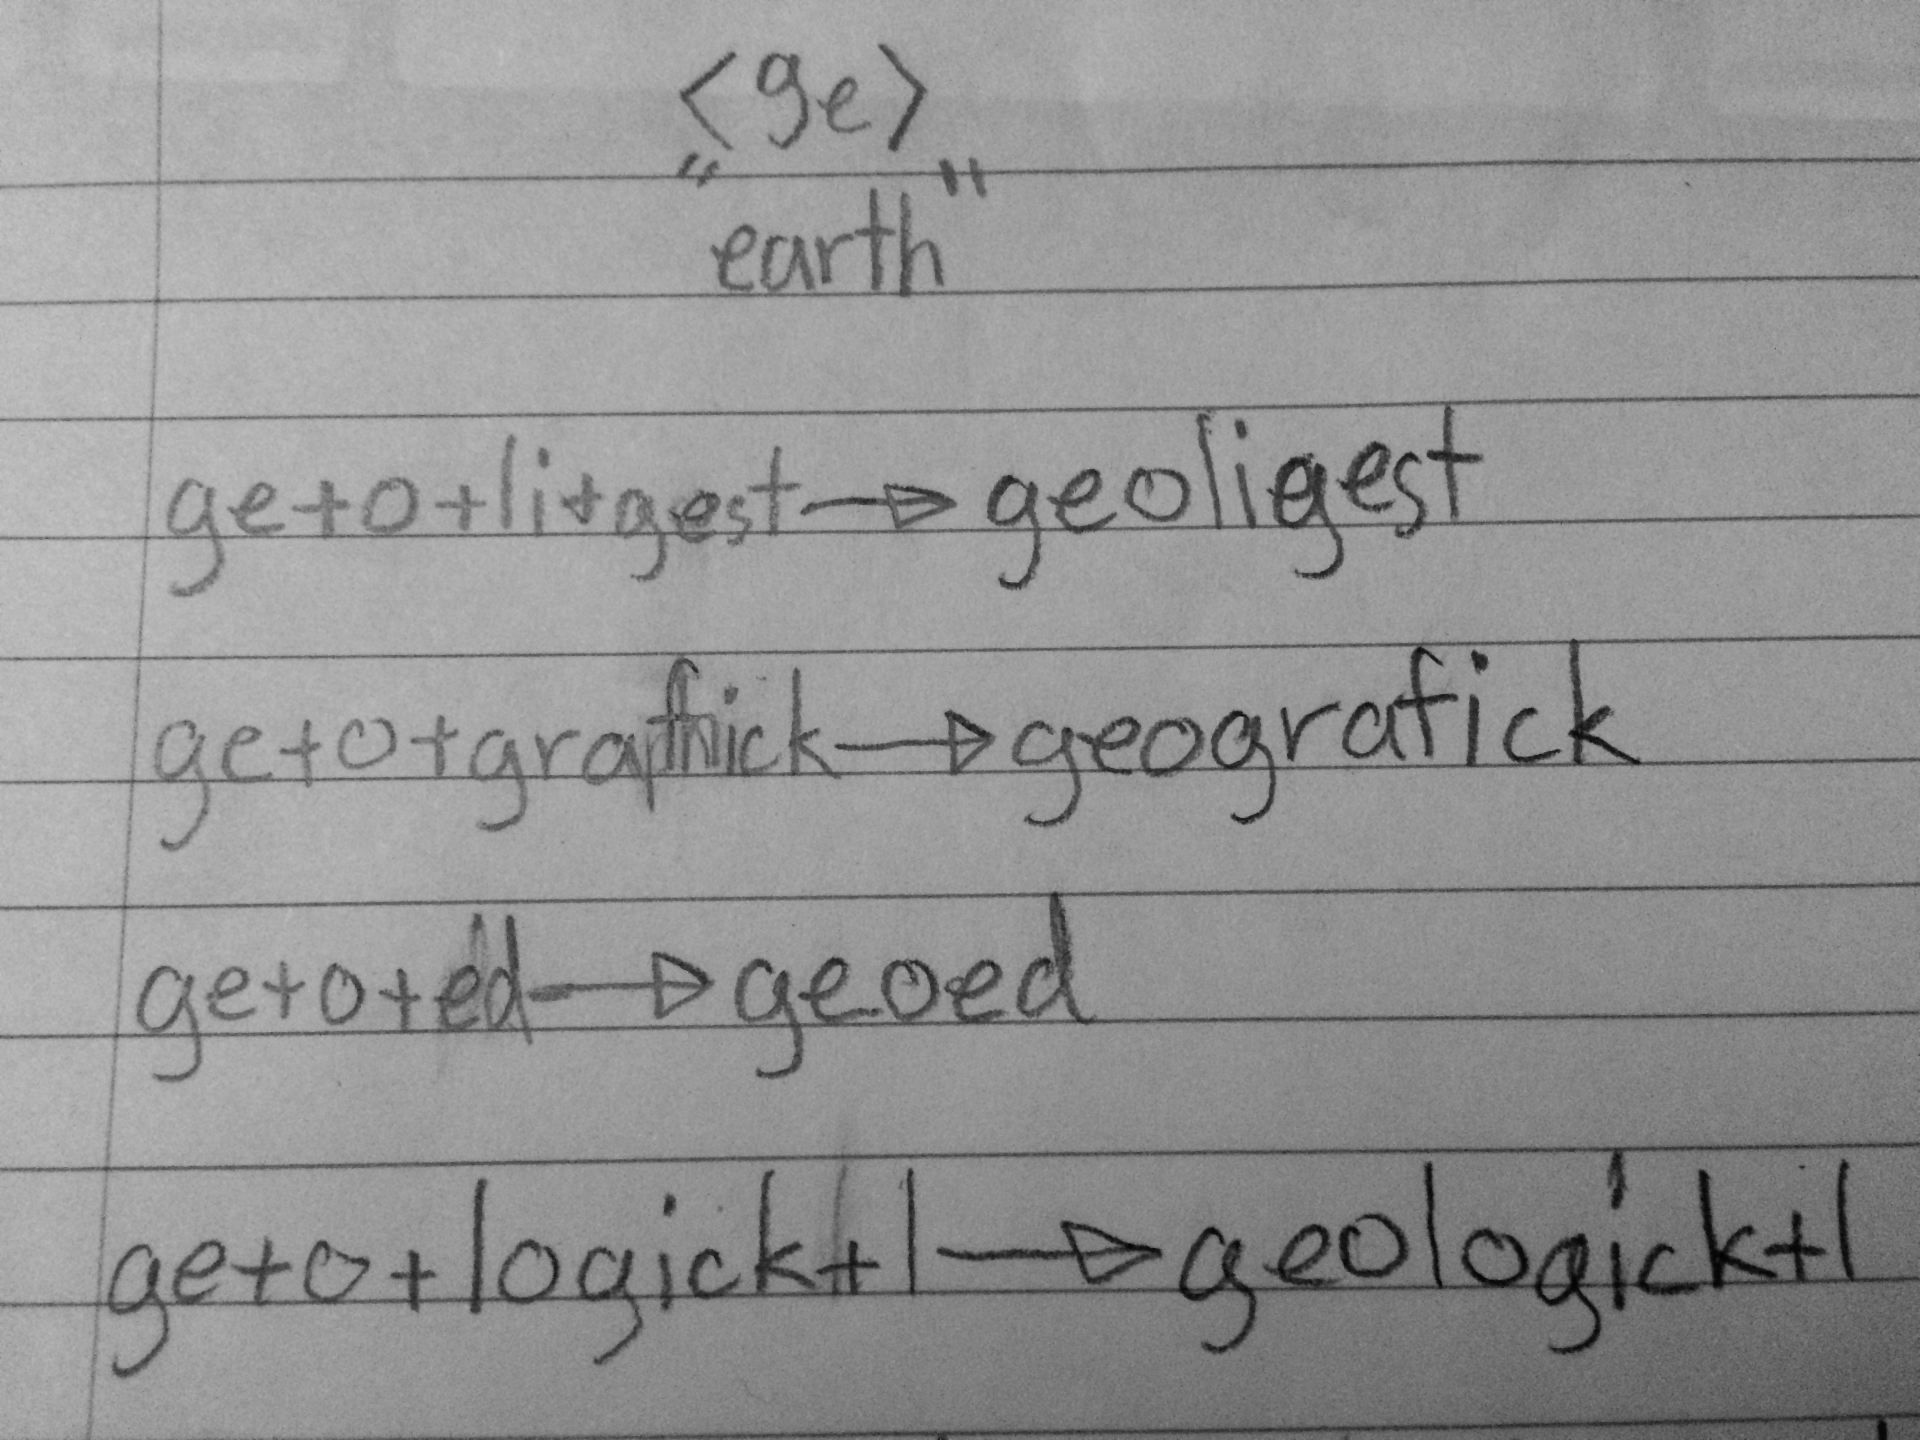
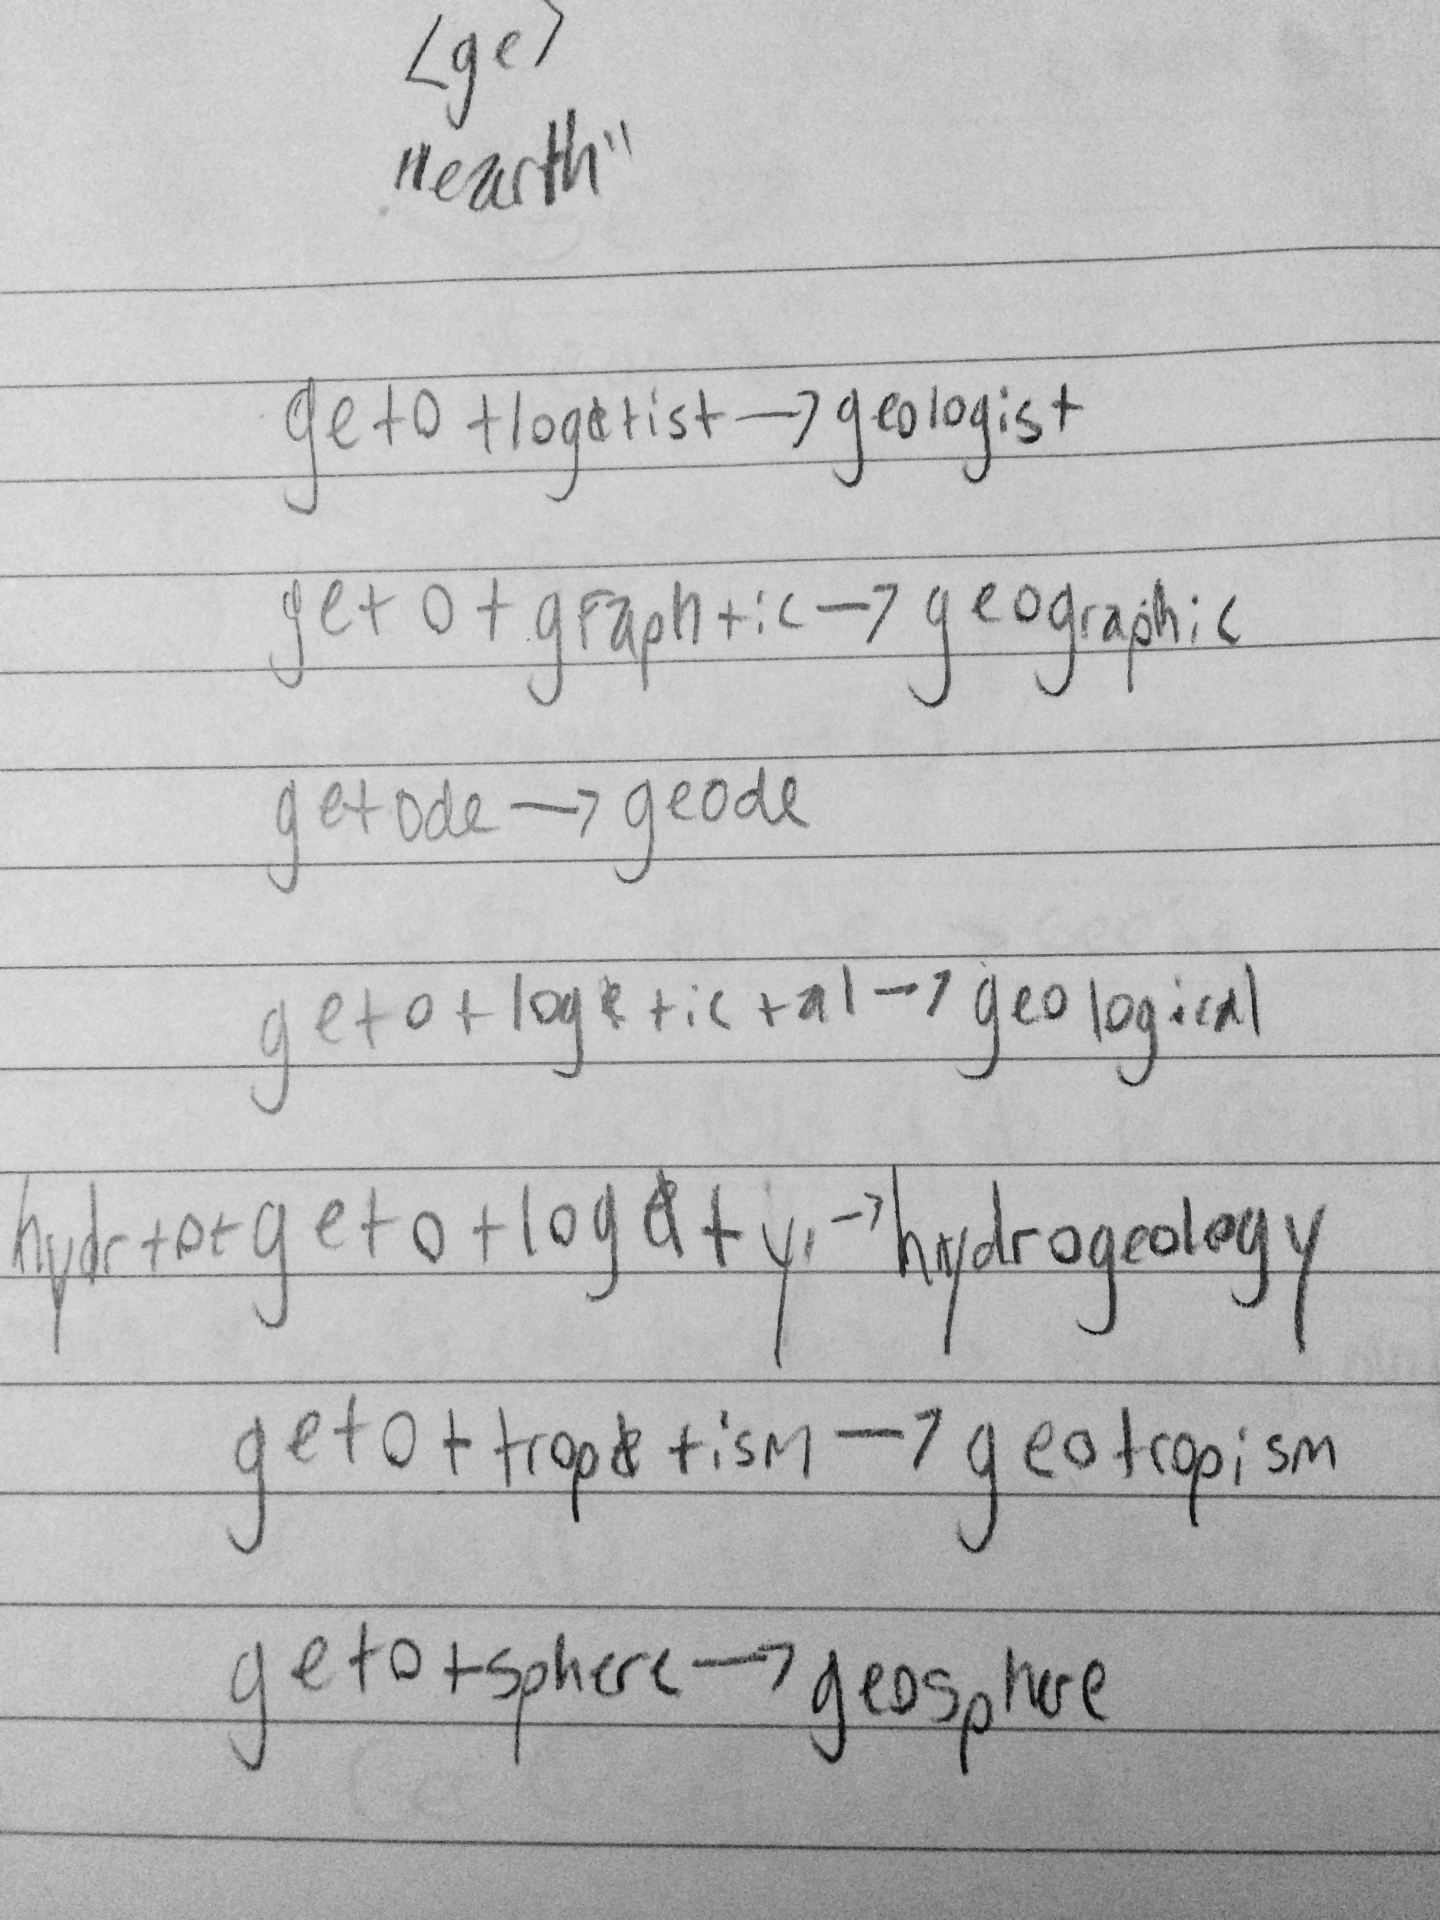
Now let’s look at ‘pentagon’ which will help us understand the spellings of the rest of the words on this list. According to Etymonline, its Greek root is πεντά–γωνος (pentagōnos) meaning “five-angled or five-cornered.” The Greek root is a compound made up of pente “five” and gōnia “angle.” From this information we can see that hexagon, septagon, octagon, and the rest are words for a shape with a particular number of angles.
An interesting relative of Greek gōnia is Greek gony “knee.” Do you see what a knee and an angle have in common? The Latin equivalent to Greek gony is genu. You may be familiar with that base in the word ‘genuflect’ which is when someone bends their knee in worship or out of respect. The Old English word for knee was cneo or cneow. In Old English, the initial <c> would have been pronounced as /k/. Now you can see where our <kn> digraph spelling came from!
3 triangle
4 quadrilateral
5 pentagon
6 hexagon
7 septagon
8 octagon
9 nonagon
10 decagon
11 undecagon
12 dodecagon
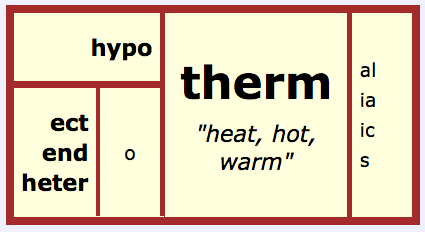
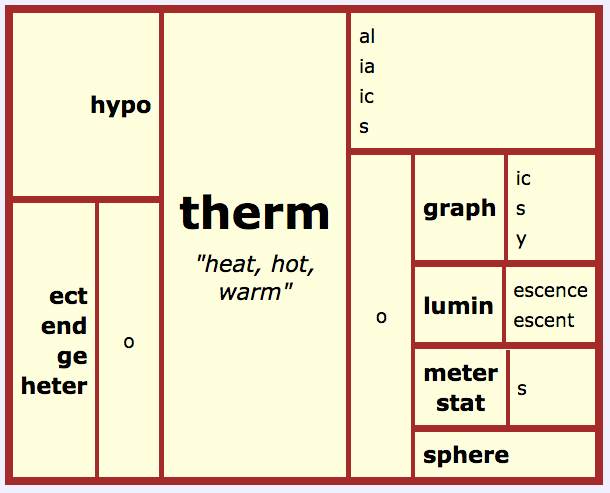
I brought together all of the words I’ve mentioned that have something to do with a numbered group. Might be a great discussion starter! Perhaps someone will think of another kind of group that gets numbered in this way that I haven’t thought to include. How exciting!
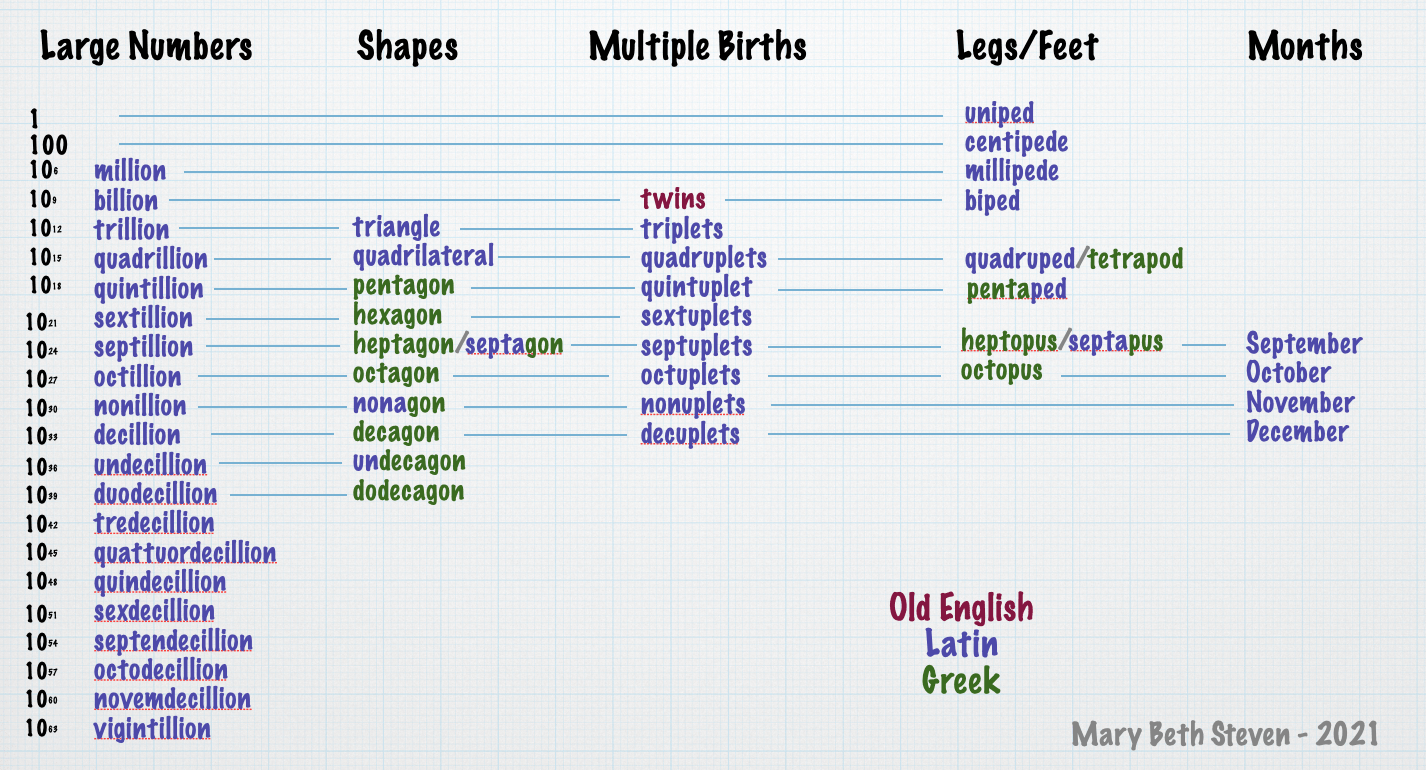
Can you and your students spot instances in which the same element is used in the different lists? Do you notice that The Hellenic people and the Romans had different names for elements that represented the same amount? Do any of the word elements we see remind you of words from other languages? What does the rest of the word (besides the element that indicates a number) in each list mean?
Here’s an idea for those of you in classrooms. Split your class into groups and pair up each group with one of these categories. Let the students find what they can about the words, their origins, and the way we use these words in our society. This would obviously be a project they work at each day for a week or two depending on your students. Your job is to circulate between the groups to offer guidance and celebrate what they are finding. Then let each group rehearse in a corner of the room before present their findings to the rest of the class. In my experience, the groups may not finish at the same time. That’s fine. Let them present when they are ready. Have some new investigations ready for the groups who finish first.
The sources I used today were Wikipedia, Merriam-Webster, Etymonline, Liddell and Scott Greek Lexicon, and the OED.


