“While We Teach, We Learn.”

“While we teach, we learn.”  This quote is attributed to Seneca the Younger, the Roman Philosopher and Statesman who lived c. 4BC – 65 AD.  In my own experience I have certainly found this to be true.  Today my students had a chance to test it out as well.

Late in October one of the second grade teachers caught me in the teacher’s lounge.  She hoped that my students would be willing to present a lesson to her students.  I was thrilled we were being invited back.  The last time we presented a lesson to her students (last year), we had focused on the <igh> trigraph.  She was so impressed that from that one lesson, second graders were able to recognize <igh> in words for the rest of the school year!  I suggested that this time we focus on the suffix <-ed>.  She said, “Perfect!”

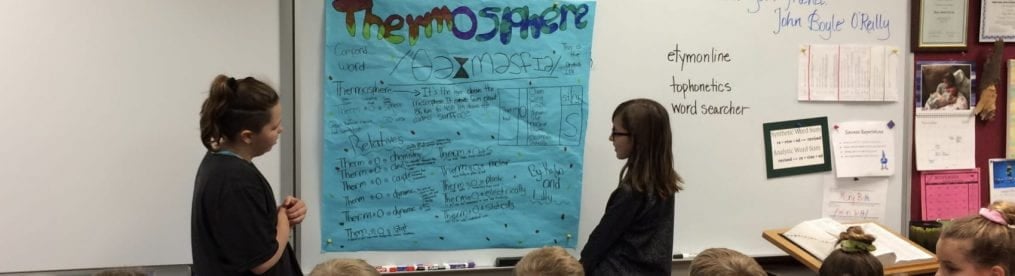
I knew we had a lot of projects in the works, but this was something I looked forward to.  Each of my three groups of fifth graders prepared materials and practiced using them.  Then today I took the classes one at a time to the three second grade classrooms.  Here is how I introduced the lesson.  Then the fifth graders and second graders worked one-on-one to practice adding the <-ed> suffix to various words.

It wasn’t until I reviewed this film after school that I noticed the boy holding the two letter p’s.  He is obviously confused about when it is doubled.  He doubled it when the <-ed> suffix was added to <jump>, he doubled it when the <-ed> suffix was added to <tape>, and he doubled it when the <-ed> suffix was added to <tap>.  Now I know exactly what I have to do with all three classes tomorrow.

We will reenact this activity in front of the room, pausing to point out the effect the <-ed> suffix can have on a spelling.  I am quite confident that my students know that the <p> is not forced to double in the word <jumped>, but I bet they will struggle with explaining why it isn’t.   I will then thank this boy for giving us the opportunity to take our understanding to a level beneath the surface!

As the students sorted words into the three categories (1.  just add the suffix, 2.  double the base’s final consonant, 3.  replace the final <e>)  I circulated to listen to the conversations.  Back when we were preparing the post-it notes for this activity, we began by brainstorming lists of words that would fit each category.  One of the words suggested was <agreed>.  It was a great word to talk about then, and it was a great word to hear fifth graders explain to their new friends.  The word sum for <agreed> would be <agree> + <-ed> –> <agreeed>.  We don’t replace the final <e> on the base in the same way we would replace the final <e> in <raked>, because the final <e> in <agree> is not individual like the final <e> in <rake>.  Rather it is part of an <ee> digraph.  On the other hand, we wouldn’t leave this word <agreeed> with three e’s.  No complete English word has three e’s.  So for THAT reason, we write the word <agreed> with two e’s instead of three.

Once the students had completed the activity on side A of the construction paper, they gathered up their post-it notes and flipped the paper over.  On the other side were the three distinct pronunciations that can be the result of adding the <-ed> suffix to a word (1.  /d/,  2.  /Id/,  3.  /t/  ).  Here is video of that activity.

As one of the second grade teachers was watching this activity, she overheard me asking two students about words in which the <-ed> had a pronunciation of /t/.  Every word on their list had a base with either a final <p> or a final /k/.  I looked up at her and said quite truthfully, “I never noticed that before today!”  She replied by saying, “Me neither!  One of the best things about your students coming to do these lessons is that I learn something new too!  Will you please come back to do the <igh> trigraph lesson next time?”

Today was splendid!  We were warmly welcomed into each room.  The second graders were happy to participate and enjoyed working with the fifth graders.  The fifth graders took their role seriously, explained things thoroughly and left feeling pleased with themselves.  And, of course, having to explain things to the younger students definitely strengthened their own understanding!  After all, a wise philosopher once said, “While we teach, we learn.”

A Component of Science – Engineering

Engineering…..
The first engineering project this year was building locker shelves.  The students had to identify how many shelves they would need and how those shelves would be used.  Then they were ready to begin researching existing shelving units and collecting building materials.  The project challenge was to use as many recycled materials as possible, and to build shelves that would still be functioning as such in eight months time.  The students made drawings in their notebooks that included measurements.  Then they started building.

Here are some interesting things the students learned:

~Once cardboard is bent, it isn’t stiff like it was before.
~The thicker the cardboard, the stronger the shelf.
~Many layers of thin cardboard work as well as one layer of thick cardboard.
~A piece of cardboard cut to the exact measurements of the locker can be wedged in place and not need supports of any kind.
~Circular supports such as cardboard tubes from paper towels or soda cans make great support columns.
~Shelves can be supported with string/rope/yarn stretched across the width of the locker.
~String is stronger than yarn, and rope is stronger than string.
~One support in the middle makes the shelf a bit wobbly when weight is put on it.

They were given four days to build/rebuild.  Once the due date was past, there were two more days built-in for groups wanting to add finishing touches at their recess time.  Then it was time to take a look and reflect on how well everyone did with this project.  I gave every student a post-it note.  They were to look at all of the locker shelving and write a compliment to the locker they felt was the most functional, fun, and likely to still be standing come May.  Then they were to stick it to the inside of the locker they liked.  It was a nice surprise for students to later open their locker only to see nice comments waiting for them.

dscn6900      dscn6904

After a month and a half, we noticed that many students had developed a strange habit as they  headed out to recess each day.  Instead of setting their planners and folders in their locker, they were dropping them on the floor in front of their locker!  It prompted me to take a peek at the conditions of the shelving.

Most of the shelves had fallen or partially fallen, making them unfit to hold much of anything.  A few looked like a storage space for cardboard!  As engineers, this gave us the perfect opportunity to rethink these shelves!

dscn6897

In the first picture, only the middle shelf was functional.  The shelf above it was covered in duct tape, but unable to hold anything.  The shelves below were also to weak to be used.

dscn6901

In the second picture, two wooden shelves were held up by rulers.  That worked until something was set on the shelf.  The more that was set on the shelf, the more the shelf slid downwards.

dscn6935

In the third picture, someone had built shelving using PVC pipes.  I think the intention was that the structure would be set in the locker turned 90 degrees from its current position.  Unfortunately it doesn’t fit in that way and as a result very little fits on the shelves (except for the top shelf).

As engineers, this gave us the perfect opportunity to rethink these shelves!We began with a discussion about the purpose of building shelves in the first place.  The personal locker was needed to house outside clothing and backpacks, and the shared locker was to be used to house school supplies.  In this way the school supplies would stay dry during rainy or snowy weather because it would be separated from the wet outer clothing.

I created a rubric and shared it with the students so that they would be able to keep in mind the goals of this project.

img159

The students had a second chance to make it work.  What would they do differently?

img_0572

This first locker shows shelves that were once supported by rulers that didn’t hold much weight.  Now the shelves are held in place by a network of string, and they are very sturdy!  The rest of these show some designs that have been improved and are now quite functional!  It is interesting that there are as many shelves built up from the bottom as there are suspended from above!  I think some great improvements were made!

img_0568 img_0562 img_0565 dscn6906 dscn6907 img_0557

dscn6895img_0558img_0563

I loved the innovation in the last locker shown.  See the extra shelf suspended on the inside of the door?  This was a fascinating process to observe!

Save

Save

Learning From 16th Century Scribes

At the beginning of the year I asked my students to write me a letter.  It was a way for me to get to know them.  It was also a way for me to assess their writing skills.   I gave them prompts for each paragraph so that they didn’t have to wonder what to write.

The first time I read through them I just plain enjoyed hearing each student’s voice – the way they talked to me on paper.   I got a peek into their “outside of the school day” life.  I will look back at these letters often throughout the year to remind myself that each child is so much more than what I see in 90 minutes each day.

The second time through I kept track of things so I would know which writing skills each student needed to improve on.  I specifically made notes about:

sentence structure
spelling
paragraphing
friendly letter format
margins – left, right, bottom

One of the unexpected finds was inconsistent letter formation.  Lower case g’s, j’s and p’s were the same size (height-wise) as a’s.  The letter p was often capitalized, even when it didn’t make sense to do so.  Lower case h’s and n’s were difficult to tell apart, as were i’s and j’s!  This made some student writing very difficult to read.  Not everyone’s letter formation was this inconsistent, but paired with the students’ lack of awareness for white space on the page, I made a decision to teach them script.

dscn7031 dscn7032 dscn7034 dscn7036

I am so glad I did!  As we moved forward with this and learned about proper posture and paper placement, I began to notice some rather peculiar ways in which students gripped their pen!  Most involved forcing the joint nearest the index finger tip to bend counter to its natural bend.

I recognized that tightfisted grip because it’s the same one I have used for most of my life.  For me, it forced the pencil or pen I wrote with to push against the same first joint of my middle finger, and I ended up with a rather large callus.  I remember that my elementary teachers called it a “writing bump” and spoke of it as a wonderful thing that indicated how much I loved writing.  Even though it became painful to write with such a huge callus,  I accepted that explanation in the same way I accepted so much other misinformation about writing and our language.  After all, what other way was there?

Imagine my joy in learning that writing doesn’t have to be a laborious painful activity.  Instead it can be fun … really fun!  It can be a pleasure to write and a pleasure to read.  It can be oh, so satisfying!    I want that for my students.  I want my students to feel pride in what they write and also in the presentation of what they write.

Learning a more comfortable pen hold felt odd at first, but within a month, most were enjoying the switch.The students have been able to choose between two pen holds.  One is similar to what they were using, it’s just that the index finger remains relaxed along the length of the pen.  The middle joint is free to control the movement of the pen instead of the wrist (which controls the movement when the pen is held in a tight grip).  I personally use a plume hold so that my index finger doesn’t fall back into its old habit of forcing that joint closest to the finger tip to bend in an unnatural way.

dscn6908 dscn7049

I first learned script from Real Spelling.  I’ve taken the spellinar offered, and I’ve watched the dvd’s, pausing to practice certain letters and flourishes. Chancery Script itself dates back to the early 16th century.  An Italian scribe, Ludovico Vicentino degli Arrighi, wrote a pamphlet in 1522.  It remains quite influential as it describes the writing of Chancery Script.  It is called La Operina.  Chancery Script was developed by scribes who spent their lives copying documents and needed a comfortable yet aesthetically pleasing writing.  Here is a sample of Arrighi’s writing from La Operina.

laoperina1522-page26

For starters, we focused on holding up our hands and imagining that the body of each lower case letter had a consistent height.  You will understand this best if you try it.  Hold up your hand and draw an X across the palm with your finger.  That is what we call the “X height”.  If you are writing the letter b, you would begin in the ascender area (tips of your fingers) and pull down to the bottom of your palm (bottom of the X).  Then you would bounce back up to the X height’s right corner before pulling down again to complete the letter.  As the combination of proper posture, a relaxed pen hold and the use of a fountain pen meld together,  the pen strokes become less independently drawn, and become more of a flowing movement, as if the pen is dancing across the page!

We spent time each day practicing our lower case letters and the ligatures we might use to connect certain letters.  We learned some flourishes to use with lower case letters, and practiced them so we could make personal decisions as we developed our personal style of script.

dscn6870

The capital letters are done a bit differently.  They are drawn.  They can be of a different size then the rest of the letters depending on your purpose for writing and the space you have available.  The students were enthusiastic to see possibilities for the initial letters of their names.  They were particularly impressed with Queen Elizabeth’s signature and wanted to develop their own.  Here are some samples of the students practicing Queen Elizabeth’s signature.  The first picture is her signature.  Notice the flourish at the beginning of the lower case b and the knotting below the z!

dscn6868 dscn6871 dscn6873 dscn6878 dscn6884

The following pictures are of the students practicing some capital letters.

dscn6913 dscn6912 dscn6911 dscn6910 dscn6909

As you can see, the students write on unlined paper, but use an underlay so that the writing remains straight.  The lines on the underlay are a bit wider apart than regular lined paper.

The next step was to create a sheet of writing in script.  Some had already been turning in assignments in script, but not all.  I asked each student to write a fall poem.  I gave them a poem to model it after.  The poem would have three stanzas.  In this way we could practice not only script, but also using white space on a page.  As the students finished their poem (which was now a work of art on several levels), I hung them in the hall.

dscn7125 dscn7118 dscn7123 dscn7124 dscn7121 dscn7122 dscn7115 dscn7129 dscn7130 dscn7128 dscn7127 dscn7120-version-2

There’s quite a difference between the first day letters and these poems!  Not all students are using script consistently yet, but the majority already feel a personal pride they never felt before!  In the following video, the students explain what it is they like about writing in script.

Save

Save